
Single Roll Review: Nikon FE2, Back From the Dead
shooitn ann arbor on a broken nikon fe2
I’ve mentioned before I’m a big fan of Nikon film cameras and have at some point owned almost every model of SLR they’ve made. When I had my film renaissance, the Nikon FM2 and Nikkor 105mm AIS lens were number one on my bucket list of gear I wanted to own some day. Thankfully I was able to get that camera a handful of years ago in a box of gear from a retiring photographer. It’s, in my opinion, the finest mechanical camera made outside of Germany. As I have used it more, I keep reading that it’s electronic sister is just as good and in some ways maybe a little better. They both use the same lenses, the same shutter capable of shooting 1/4000 second but the FE2 is a little quieter and has a nicer light meter.


I watched online and looked at garage sales the past few years and pretty much gave up ever finding one at a reasonable price. I do not like paying $200 for a piece of a kit I already have almost the exact same thing of, but I was willing to pay $50 or so if one popped up. Then just before Christmas last year I found a facebook marketplace deal I thought was too good to be true. The terrible picture definitely had the FE2 I wanted along with 4 lenses and another camera I figured I could sell for half of what the package was going to cost me. I was so excited to finally get the camera I completely forgot to check the internals and was just distracted by how weird the guy I was buying it from seemed. It was a hard lesson learned, but about halfway home I stopped for gas and checked it out…the titanium shutter was totally destroyed. Long story short, I know there are lots of damaged bodies out there and most of them are super cheap. I just needed an ebay special with a shutter I could swap out. I ended up finding what I needed, combined all the best parts and now have what looks and feels like a brand new camera.

For its first outing, I took it to Ann Arbor to shoot a few photos of the parts most people don’t look for. Here are the fruits of my labor. Now after shooting the roll in some of the greyest days Michigan has to offer, the FE2 might very well be my body of choice. Not enough to take as my main vacation body this year, but maybe enough to take out as my daily driver.
Winter Reflections on Cinestill 800
Shooting Cinestill 800 film in brighton michigan on a nikon f3

Downtown Brighton
One of the most difficult parts of living in Michigan during winter is the lack of usable daylight. It makes for less creative inspiration and fewer opportunities to go out and shoot a roll of film. The good news? It forces me to try new things and use new film stocks to accommodate the few times I dig a little deeper to go out.


I have picked up a handful of Cinestill 800 ISO rolls, which is old cinema film respooled to use for still photos. The neat thing about this film is the ability to use it in low light. The glow around the lights it creates can be super cool if it doesn’t overtake the focus from the actual subject I’m trying to frame.

I loaded up my most trusty camera and lens, Nikon F3 and Nikkor 55mm f1.2 to really take full advantage of the low light. We went to downtown Brighton for Christmas lights and hit up a few neighborhoods for some of the over-the-top displays we knew about ahead of time. I think the results came out perfect for the situation, and honestly look even better than the real-life, real-time lights we saw.


I’ve held out on using this film for a long time, but I’m so happy with how well it handles that it will be going into a regular rotation. Even if I’m not shooting lights, I love the way it captures everything from buildings to people, and most importantly it’s readily available from every shop I’ve ever gone into…unlike some of the other films I’ve liked in the past.


Mistake in Estes Park
Shooting Kodak Ektar film in Estes park Colorado with a Nikon f100

Rocky Mountain National Park, Nikon f100
Shooting film in the Rocky Mountains is nothing like shooting anywhere else. The light is usually overwhelming, and the skies are a shade of blue you just don’t see in the Midwest United States. Decisions need to be made carefully and in situations like this I don’t have a lot of experience. So, when we visited Estes Park Colorado and Rocky Mountain National Park, I decided to use the most advanced camera I owned, a Nikon f100. Metering the light for exposure and being able to autofocus seemed to be the perfect piece of gear to capture shots at 10,000 ft above sea level. I had specifically chosen to bring a roll of Kodak Ektar 100 film for this part of the trip. 100 iso film needs a lot of light but makes images with very fine grain and super sharp. This particular film stock tends to be more reddish in tone and doesn’t make for great portraits, it makes for good landscapes though.

Rocky Peak, Nikon f100

Resting Estes Elk, Nikon f100
Estes Reservoir, Nikon f100
Estes Beach, Nikon f100
For the trip I had been relying on the cameras ability to read the DX code on my film rolls. DX codes are similar to a QR code and tells the scanner inside a camera what iso the film should be exposed for. The higher the iso number, the less light it needs, either by time or size the lens aperture opens. Unfortunately, the roll prior to the Ektar being loaded had no DX code and I had manually set it for 400. By not changing it back to automatic, I had overridden the camera and forced it to shoot with significantly less light than it needed. If I had remembered this, I could have asked the lab to adjust their development time to accommodate it, which would have made for perfectly good photos and just a little more grain than usual. By not adjusting and running it through at the box speed, I ended up with some pretty underexposed photos. Besides the importance of learning a valuable lesson I do think I ended up with some neat shots. There’s a real Lunar feel in the mountains, and a vintage vibe on what I was able to grab at the Estes Park reservoir.

RMNP, Nikon f100

Hoopin, Nikon f100

Split Rail Estes, Nikon f100

Power Struggle, Nikon f100
I learned a lot on this trip in 2022, the most important one being to make sure I’m shooting at the right speed.


Single Roll Review: Pentax SF10
Pentax SF10 and Pentax af 50mm f2.8 macro lens review
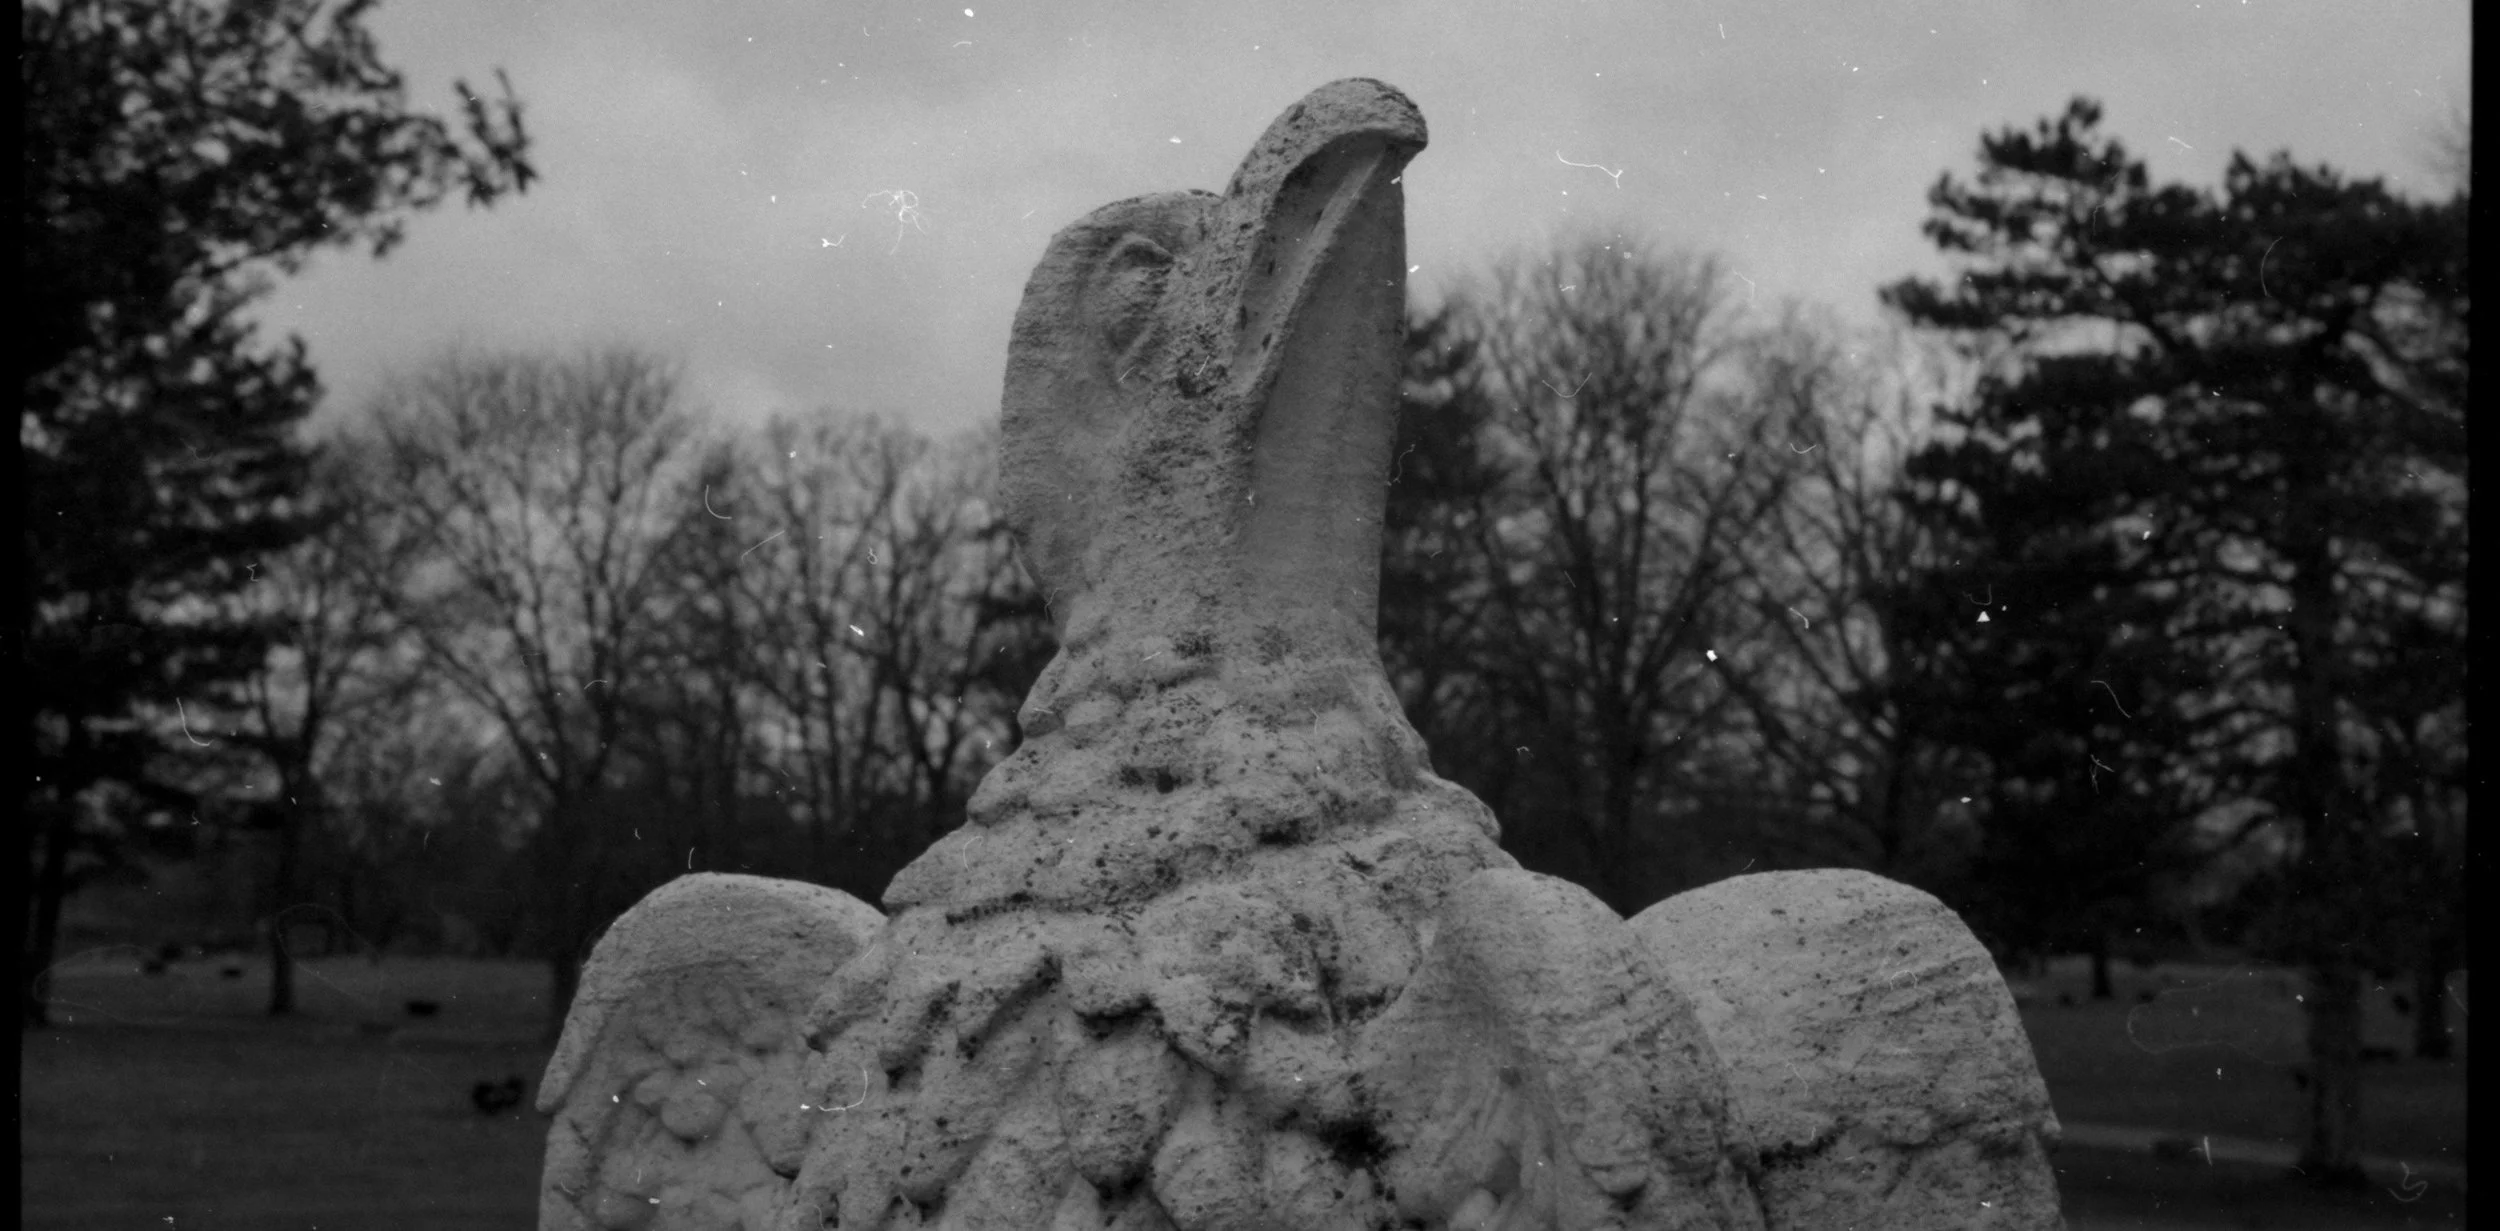
Grave Eagle, Pentax SF10
As I’ve grown in my photography my preferences have stayed pretty much the same since I started. Autofocus cameras are not typically the style I use, but I’ve found it’s sometimes good to mix up my choices just to spark a little different creativity. This is the case for today.
Pentax SF10, Pentax SMC F 50mm f2.8 Macro
Way back when I started shooting film, one of the most vocal encouragers was my friend Colleen. I could count on hers being one of the first comments on every post I made regardless of subject or time of day. I got my very first film scanner from her (a Canoscan 5600f) and one day I got a text from her asking if I was interested in her old camera. When she said it was an old Pentax, I couldn’t say yes fast enough. I don’t usually shoot the brand, but Pentax people always seem to have stories and a connection to their old cameras that I haven’t found when I buy other cameras. When I picked up this SF10 along with a few nice lenses, the unassuming body didn’t look nearly as capable as the professional Nikon bodies I had been collecting. Looks can be deceiving as this body hit focus at a rate I haven’t gotten with any other system.

Chiclets, Pentax SF10

Have a Nice Day, Pentax SF10

Face of an Angel, Pentax SF10

While it doesn’t offer any real control over ISO and the creative priority functions are slightly cumbersome to set up, it is fully capable of doing everything I want. From what I have read it was intended to be used in program mode by those that wanted more than a point and shoot can offer, but didn’t want to take full control over every aspect of the photo the way a professional body can. Once paired with the only macro Pentax lens I currently have I was able to get closer and more detailed images than I have with any of my other cameras. This may have more to do with my skill than the equipment, but it was a joy to use. It worked really well with the architecture I shot at Michigan Stadium too, and was so sharp even with my mediocre scanning technique I think I could print it at poster size and it would look fantastic.

Hail, Pentax SF10
Overall, the Pentax SF10 may be one of the older autofocus cameras built (1988), but for film use I would recommend it thoroughly if you either have or want Pentax lenses to use. It can use almost every K-Mount lens made whether manual or auto focus. After spending a few weeks shooting with it, the only negative thing I have to say about it is the battery is a little expensive but does last a long time. If you want to shoot a chunky camera with an 80’s or 90’s vibe you can’t get much better value than this.

Moss Garden

Tomato, Pentax SF10
Happy New Year 2024
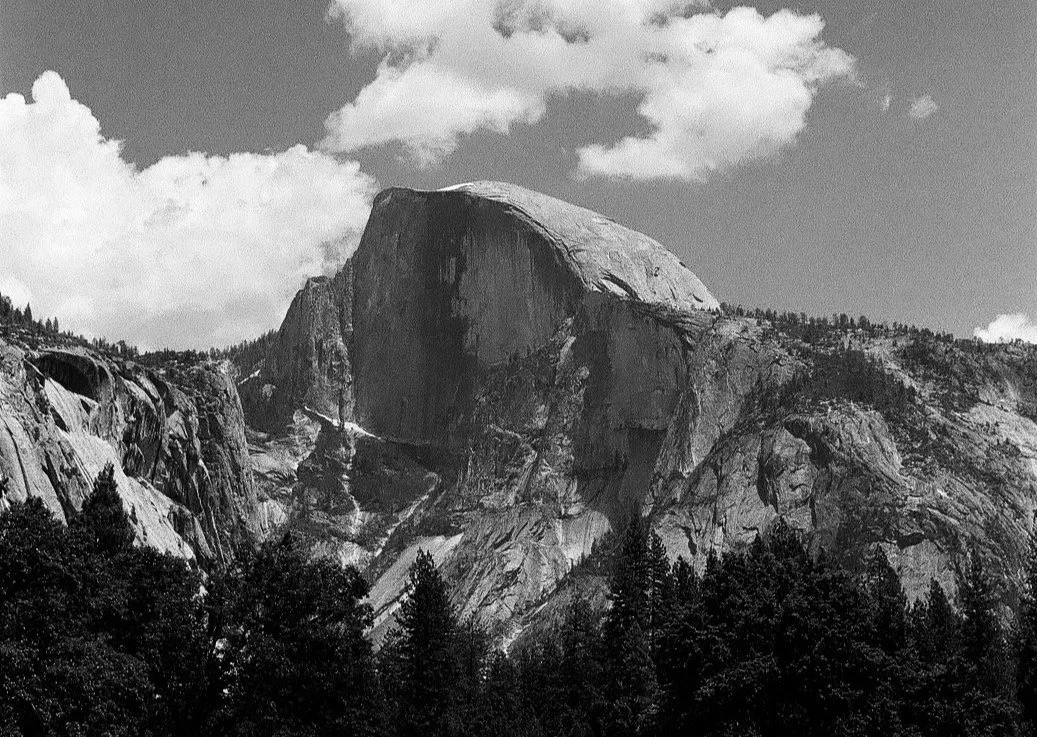
Yosemite Half Dome, Leica M2, Summicron 50mm v1
First of all, thank you to everyone for joining me in my first “year” of running this blog. 2023 has been a very exciting time for me and everyone involved with Single Roll, not only as this blog but behind the scenes as we have explored how to share our love of photography and vintage cameras. As many others do this time of year, I went back to review what I shot this year and picked some of my favorites to reshare.

Bronco, Nikon FE, Nikkor 50mm f1.2

Glacier Lodge, Nikon F2, Nikkor 50mm f1.4

Driftwood Overlook, Nikon F2
Badwater Basin, Death Valley, Nikon F2
For 2024, I will be exploring some new stories and ways to shoot my day to day life. Portraits and product photography are areas I want to learn better, so be prepared to hopefully see more faces and cool stuff this year. I also have multiple cameras still waiting to even be used, mainly because I don’t really use autofocus. For the new year it’s time to not only start breaking them out, but also learn how to use all the features manufacturers added to their bodies between the 70’s and 90’s. Enjoying the same 60 year old cameras and lenses for every trip and event has begun to be too much the same, and I’m ready for a little bit of a challenge.

Angelic, Polaroid SX70

Texas Rte 66, Nikon F2

Yosemite Falls Midday, Leica M2
In addition, after chatting with my biggest fan, I am going to make a better effort to share on social media some of my smaller thoughts and feelings throughout the week and not rely as much on just the weekly and biweekly posts. So stay tuned, because it’s going to be a fun one!
Happy New Year!

Route 60, Nikon F2

Goose Island, Glacier NP, Nikon F2

I Love a Good Mystery Box
Shooting revolog Streak in brighton Michigan

November 2021 I was really starting to take Film Photography more seriously. Using different settings and lenses were getting me more interesting results, and I was to the point I wanted a little more creative control in colors and “tones” from my photos. At the time there were a plethora of color film rolls available and I just didn’t know what to choose that would challenge me to be more thoughtful in my decision making and I really didn’t want to buy experimental film I wasn’t sure would turn out with anything usable. Being in the position I was in I decided the best option for me would be to order a “mystery box” from an online shop and just make whatever they sent me work. I sent an order for their 6-roll pack and received 5 rolls of very normal film from Kodak and Ilford, a good variety of color and B/W. There was also a roll from a company by the name of Revolog. I had heard of them and briefly looked at what they offer in the past but hadn’t really been in a place to use it effectively so had never even considered ordering. They sell intentional “defective” film stock that will end up having results like static electricity discharges, unusual color shifting and blobby bubbles. If these were to show up on an ordinary roll of film, I would be unhappy, but if it’s expected I can plan for how it will turn out somewhat. I set aside my roll of Revolog Streak for almost 2 years and finally just decided there’s no better time than late summer to try it out. I read it should end up with a vintage look, almost as if I were shooting through a scratched window. Walking back through Downtown Brighton I tried recreating a few of my favorite photos with the twist of now using color film instead of Black and White.

It was early evening on a Monday, and most of the shops were closed. Construction already keeps the foot traffic low, so I was basically by myself shooting store fronts, alleys, and an occasional interesting car. I knew I only had 36 shots. Trying to remember things I had learned from making this same walk just over a year ago wasn’t much help, I wasn’t even using the same type of camera this time. Now I was using one of the most advanced autofocus SLR bodies ever made from 2006, while previously I was using a fixed lens Rangefinder from 1972. There has been a reset in the way I do this over the past year, and it was time for me to move on and do things in the new way. I have been able to look beyond just interesting observations, getting a little deeper into line of sight and different lighting. In a back alley by the Brighton School of Ballet there is an art installation that can be lined up with the Lions Club statue to create a nice frame. Is it groundbreaking? Not really, but I’m glad I saw it this time so I can integrate that into something later.


I’m still learning how to capture wildlife and vehicles. There’s not much to be done that hasn’t already been done over and over. Maybe someday I will discover something, but for now I still really like just seeing the lines of an exotic car and adorable animals through the lens of my camera. Brighton has an active car culture, both classic and exotic with a few camouflaged preproduction models from time to time and everyone is more than willing to let me take a few shots when I ask. If any of you have an interesting car and want me to come do a photoshoot, I’m sure we can work something out. Unfortunately, an ongoing color film shortage has made the mystery boxes I was enjoying a thing of the very recent past. I’m hoping this comes back soon as it’s really quite a fun experiment…or maybe I’ll just go to one of the local shops and ask them to build one for me and make a whole new post about it.


Overall, I am very satisfied with how this roll turned out. In the future I would probably overexpose it a little as they are a little dark. I think it’s supposed to be that way since the scratches are more pronounced in the darker areas. The rolls are marginally more expensive than standard premium rolls which makes sense as they have added the special effects in house, or at least have the know how to do it consistently to existing film. I think I may need to order a roll of their Tesla film for some Halloween shots this year, and some a roll of Paper for some old-fashioned shoots.


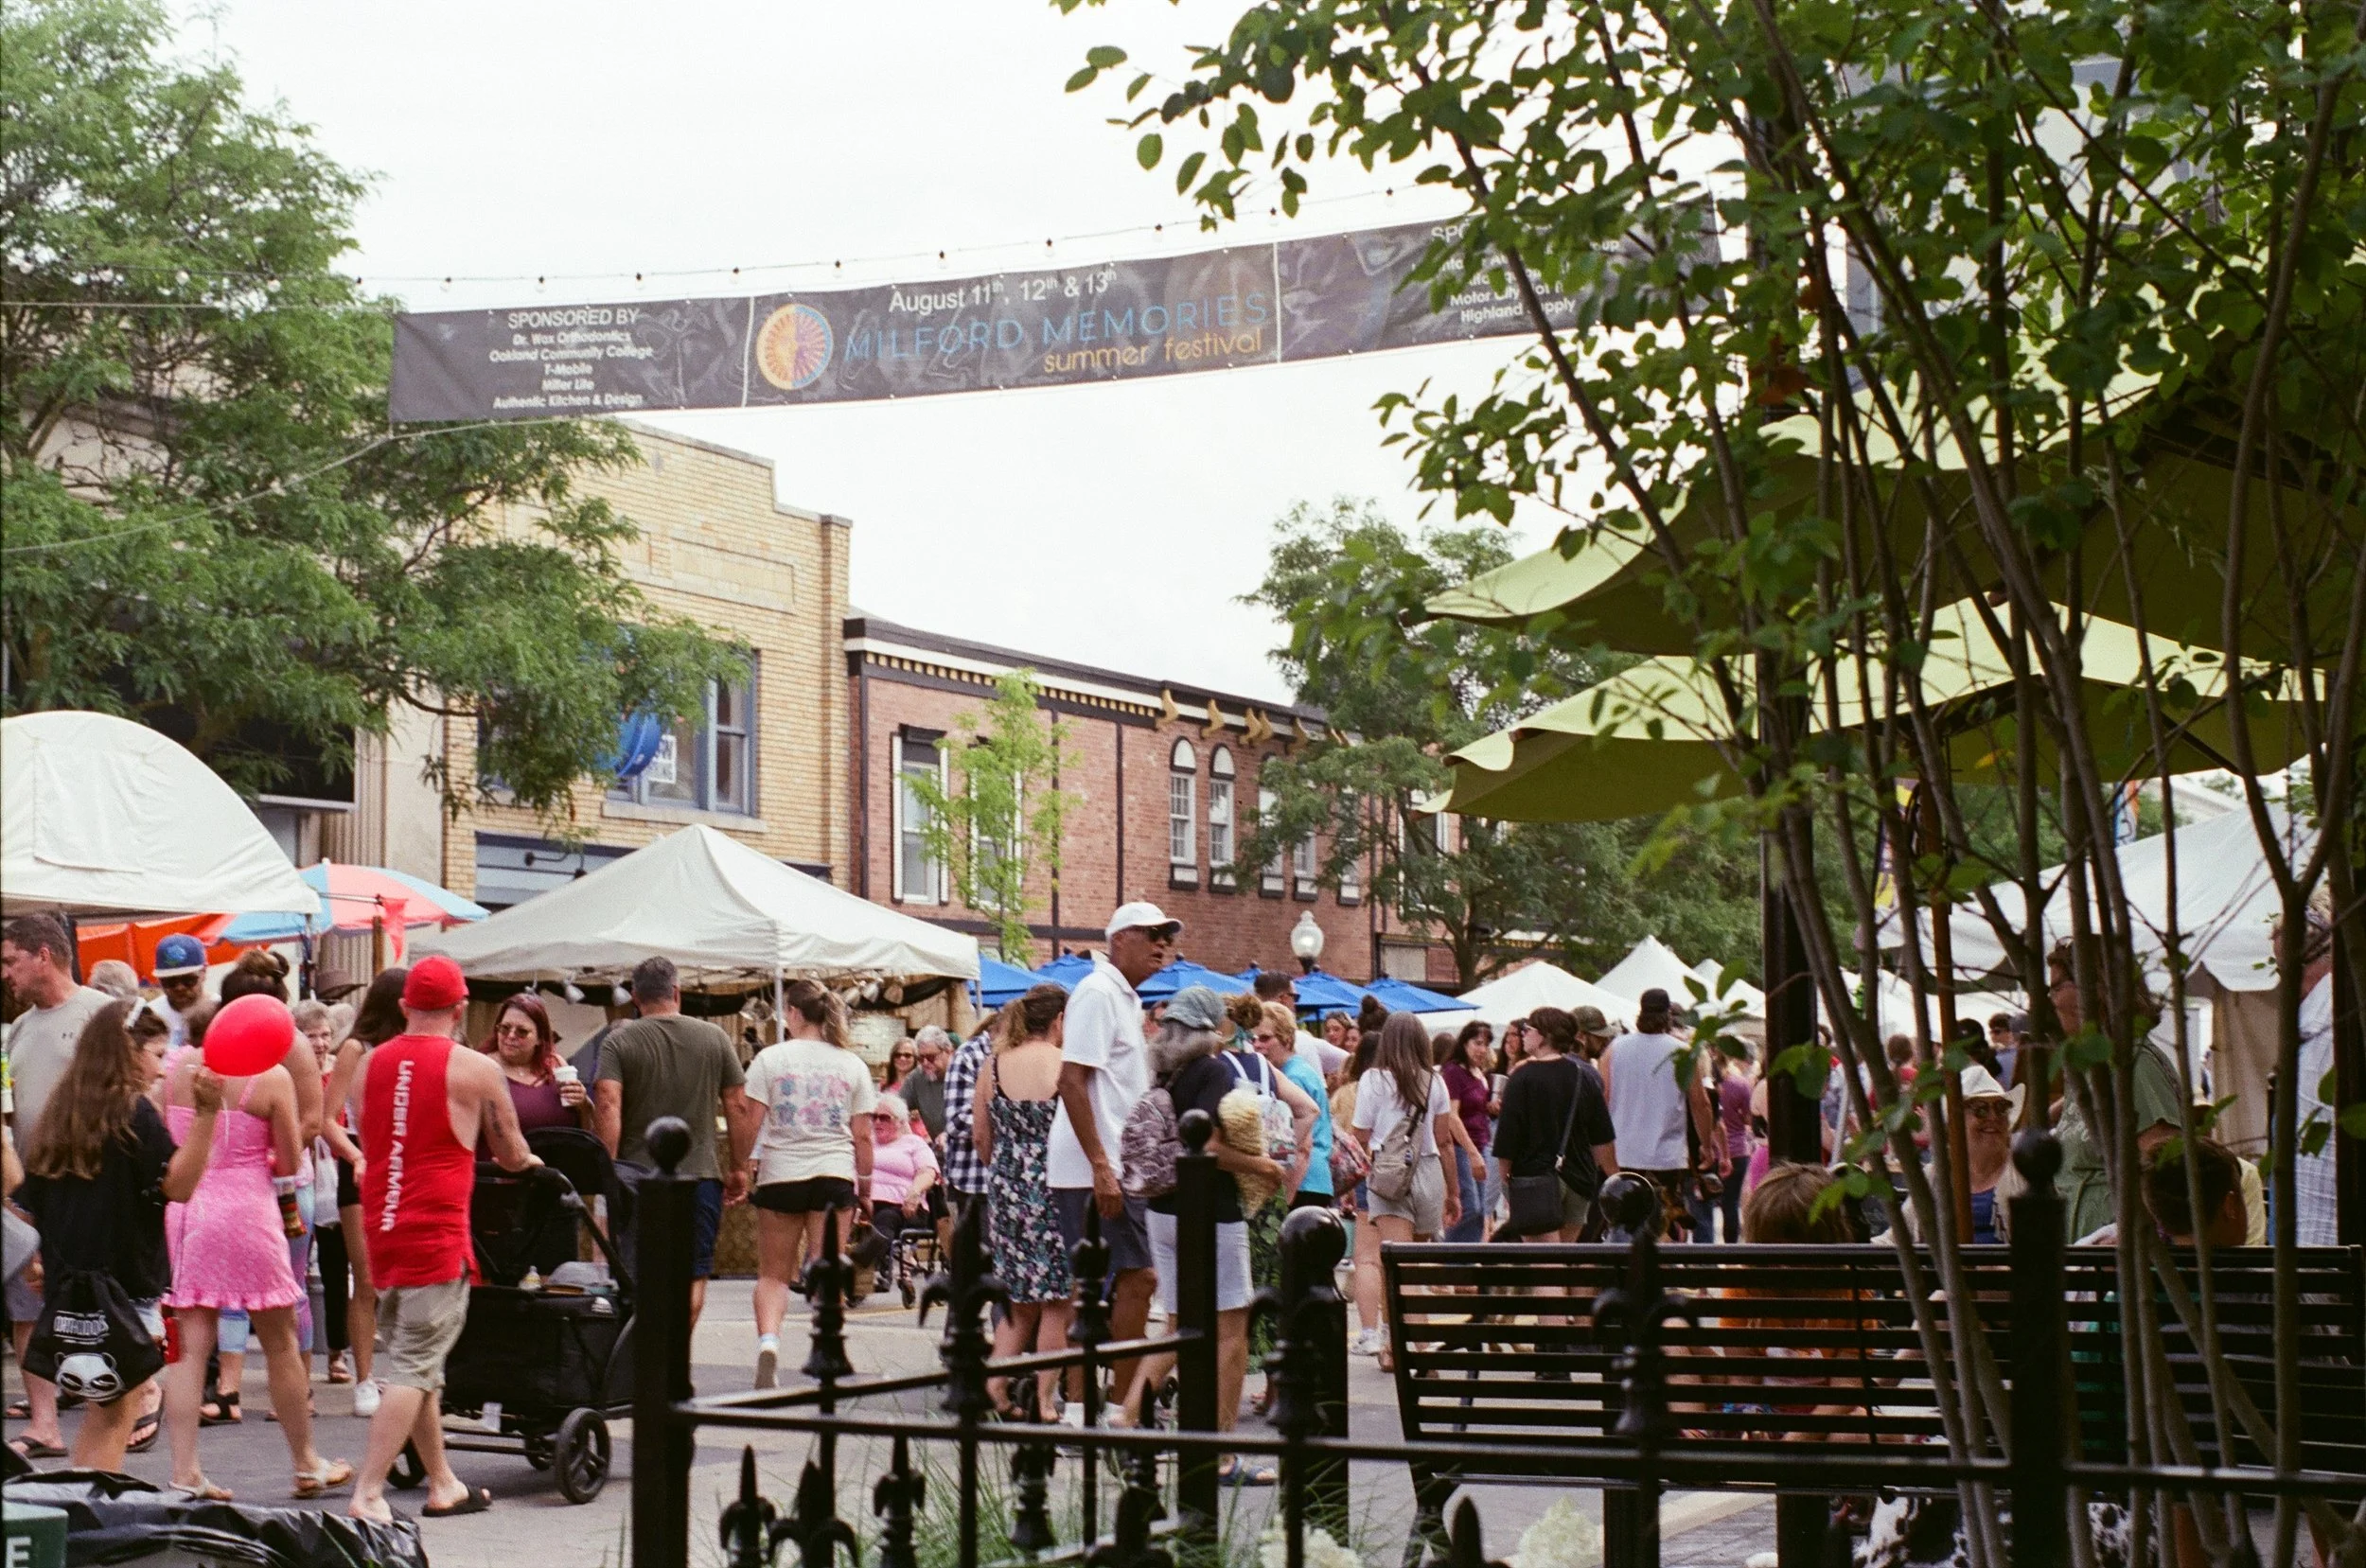
Mid-Summer Milford Memories
Review of Nikon FE 35mm Film SLR and Nikkor-SC 55mm F1.2 lens. Milford memories, Milford Michigan

Apocalypse, Nikon FE
Every year without fail I make the decision to go and wander the Milford Memories street fair. I almost never end up buying anything, preferring walking and watching all the people that come for the same reason, and admiring art people far more talented than me have brought to display. This year also happened to coincide with finding a lens I have wanted to try for quite a while, a Nikon 50mm f1.2. I own several similar lenses with a smaller aperture. Aperture is basically how large a lens can open to allow light in for a photo and the smaller the number is, the larger the opening will be. Allowing more light in also enables you to use a faster shutter speed which is very useful in low light situations. For this lens I could very easily pick one up at any number of camera shops or eBay, but I wanted this specific version. It is a 55mm not a 50mm, but it’s close enough. It was built around 1972-1974 and was designed to be used with the original Nikon SLR bodies, but in most cases cannot be used with newer cameras. Nikon had realized this and made a factory kit for easy modification to the lens to be used with all ensuing cameras, but these kits have become very rare. This kit on this lens were exactly what I have been looking to pick up for at least the past year. It’s a big slab of glass and metal that looks right at home on any of my favorite cameras.
Milford Memories is a great art fair because it’s not only massive, but also very easy to navigate and has shade over about half of it. The people watching is good and even on a busy day it’s not super crowded. There is music, food, beer and most importantly for the day I went, plenty of photo opportunity. On this day, I had chosen to bring my new lens and decided I would try to shoot some expired Fujicolor Superia 400. It’s typically a film I avoid because of the way it makes colors lean more toward green, but if ever there was a time for experimenting today was the day. I shot it at 200 iso, which would allow more light to be exposed to the chemicals and if done properly can give a nice vintage look even in harsh daylight. I have been working on getting more comfortable shooting photos of people, which is much easier in large crowds. One thing I’ve noticed about taking street photos more and more is nobody really cares. It takes a little time to get over being overly self-conscious of it, but I think I’m finally getting to a point I can confidently go out and photograph even individuals without feeling weird about it.

Arms, Nikon FE

Bros, Nikon FE
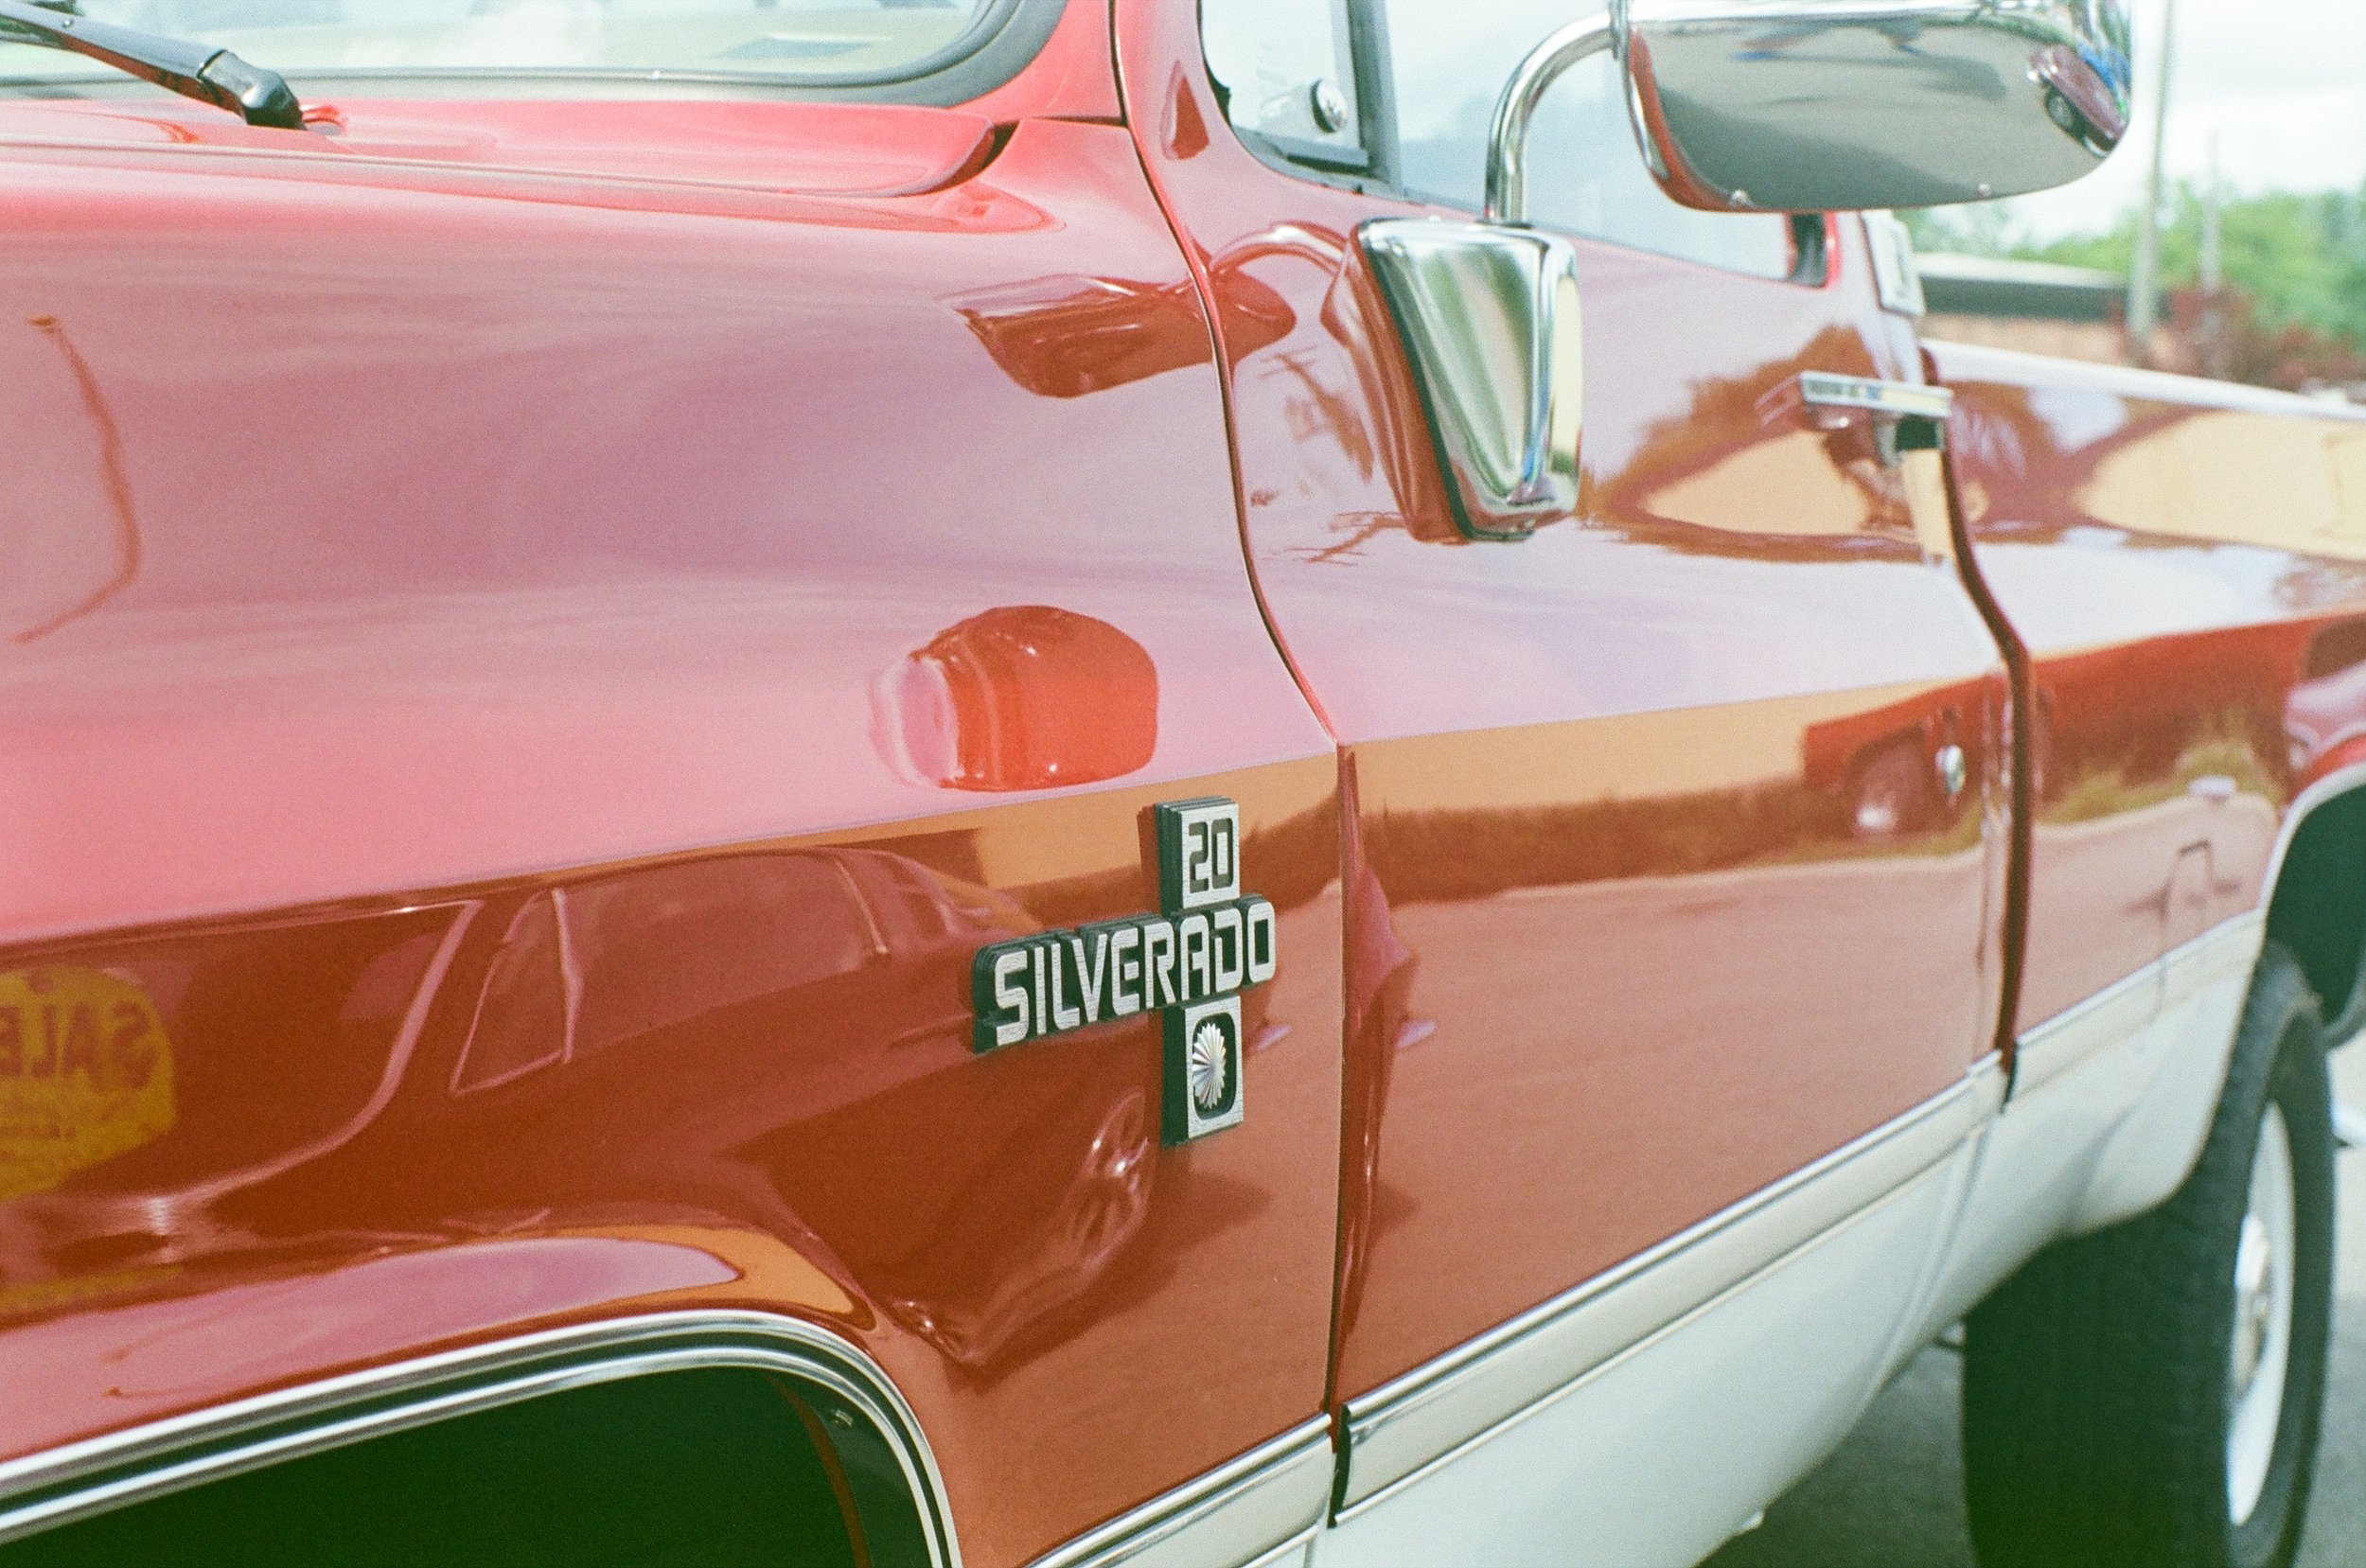
The main draw of this trip was the art fair, but I had forgotten about my favorite business in the city. Right at the end of the downtown strip is an auto dealer specializing in classic cars and trucks. I’ve been meaning to go shoot here for several years once the outdoor selection was something I was interested in. They’ve had lots of intriguing vehicles on the lot, usually one or two I would be able to make something with. This day they had so many square body trucks and SUV’s out, I had to get all the standard shots of them. It doesn’t take much creativity to get a fender, or a side shot of a classic car, and many people would say it’s overdone. I am not that kind of person, and when is the next time I will have access to a bright red 1975 Ford Bronco?
Nikon FE


Overall, it really was an excellent day. Spending time with my wife on a beautiful sunny day in a fun small downtown with new gear was a great way to start the slow summer wind down. These various festivals are so much fun regardless of the topic they’re celebrating. I’ve been to art fairs, carnivals, music, and beer fests. I have yet to leave any of them feeling disappointed when I set aside a few hours to wander amongst the people.

Single Roll Review: Voigtlander Bessa II
Voigtlander Bessa II review. 120 film

This is a camera review I have been waiting 10 months to write. Just after the new year I started getting interested in folding cameras. I had acquired a broken Kodak Retina 1a in a “$100 box of cameras” trade and was hoping to find something in usable condition at a garage sale before we started the road trip I’ve been blogging about the past 10 weeks. Most of the folders I was looking at online take medium format film, which is about twice the size of typical 35 mm film. This is important because the image is larger and allows much greater detail to be captured, which would also allow an image to be cropped tighter when desired without losing much of the overall detail that does happen quickly when cropping 35mm images. The size of these negatives is silly. A 35 mm negative is 24mm x 36mm, and these 120 negatives are 60mm x 90mm.


This past May, I was driving around while waiting for some film to be developed in Livonia when I saw an estate sale sign. It was getting late, and I decided to pop in just in case there was something cool. Immediately when I walked in the door, I saw what many aficionados consider to be the best folding camera ever made, a Voigtlander Bessa II (1950-1956). After some negotiation I ended up walking out the door with this camera, an Ansel Adams framed calendar page and a new film scanner. I got to the car and within 5 minutes of owning this amazing camera, I closed it improperly and damaged it beyond usability. My dream of shooting a medium format photo in Yosemite was dead. Fortunately, there are still some very talented repair guys out there working on this kind of stuff and can fix people’s mistakes. I sent it off to Jurgen Kreckel at Certo6 just before we left for vacation and after being at his shop for about a month it came back looking good as the day I found it, and working as good as the day it came out of Germany. Since I had waited so long, I wanted to make sure I didn’t damage it again. I found the original manual online; it was the worst written user manual I have ever read. So, I did what every other person on the world does in 2023 and watched every YouTube video I could find. I feel confident I know everything I need to know about late 1950’s German folding cameras at this point, both medium format and 35mm.

It's a tricky thing to use an almost 70-year-old mechanical camera, and even trickier to try and use it at “Blue Hour”. Most photographers know the best light is the hour after sunrise and the hour before sunset, “Golden Hour”. I decided to try out a new-to-me camera and medium speed film an hour after sunset, because why not. With a slow lens and fast fading light the shutter speed had to be open much longer than I usually can get clean images from, and 6 of the 8 from this roll are extremely blurry. The two that mostly turned out made me happy enough I decided I need to take this out to shoot fall colors in the very near future. The experience was very cool and has really helped me understand the draw to using these large obsolete cameras. It’s not necessarily about making perfect photos, it’s about creating something using tools most people walk by at a garage sale or throw away entirely. After this quick impromptu photo walk I know I need to use a tripod and have better light instead of trying to make do with just a monopod and the hope I could keep it steady. Expect more from this camera in the future, along with whatever else I find at your garage sales. I promise the next shots will be better.


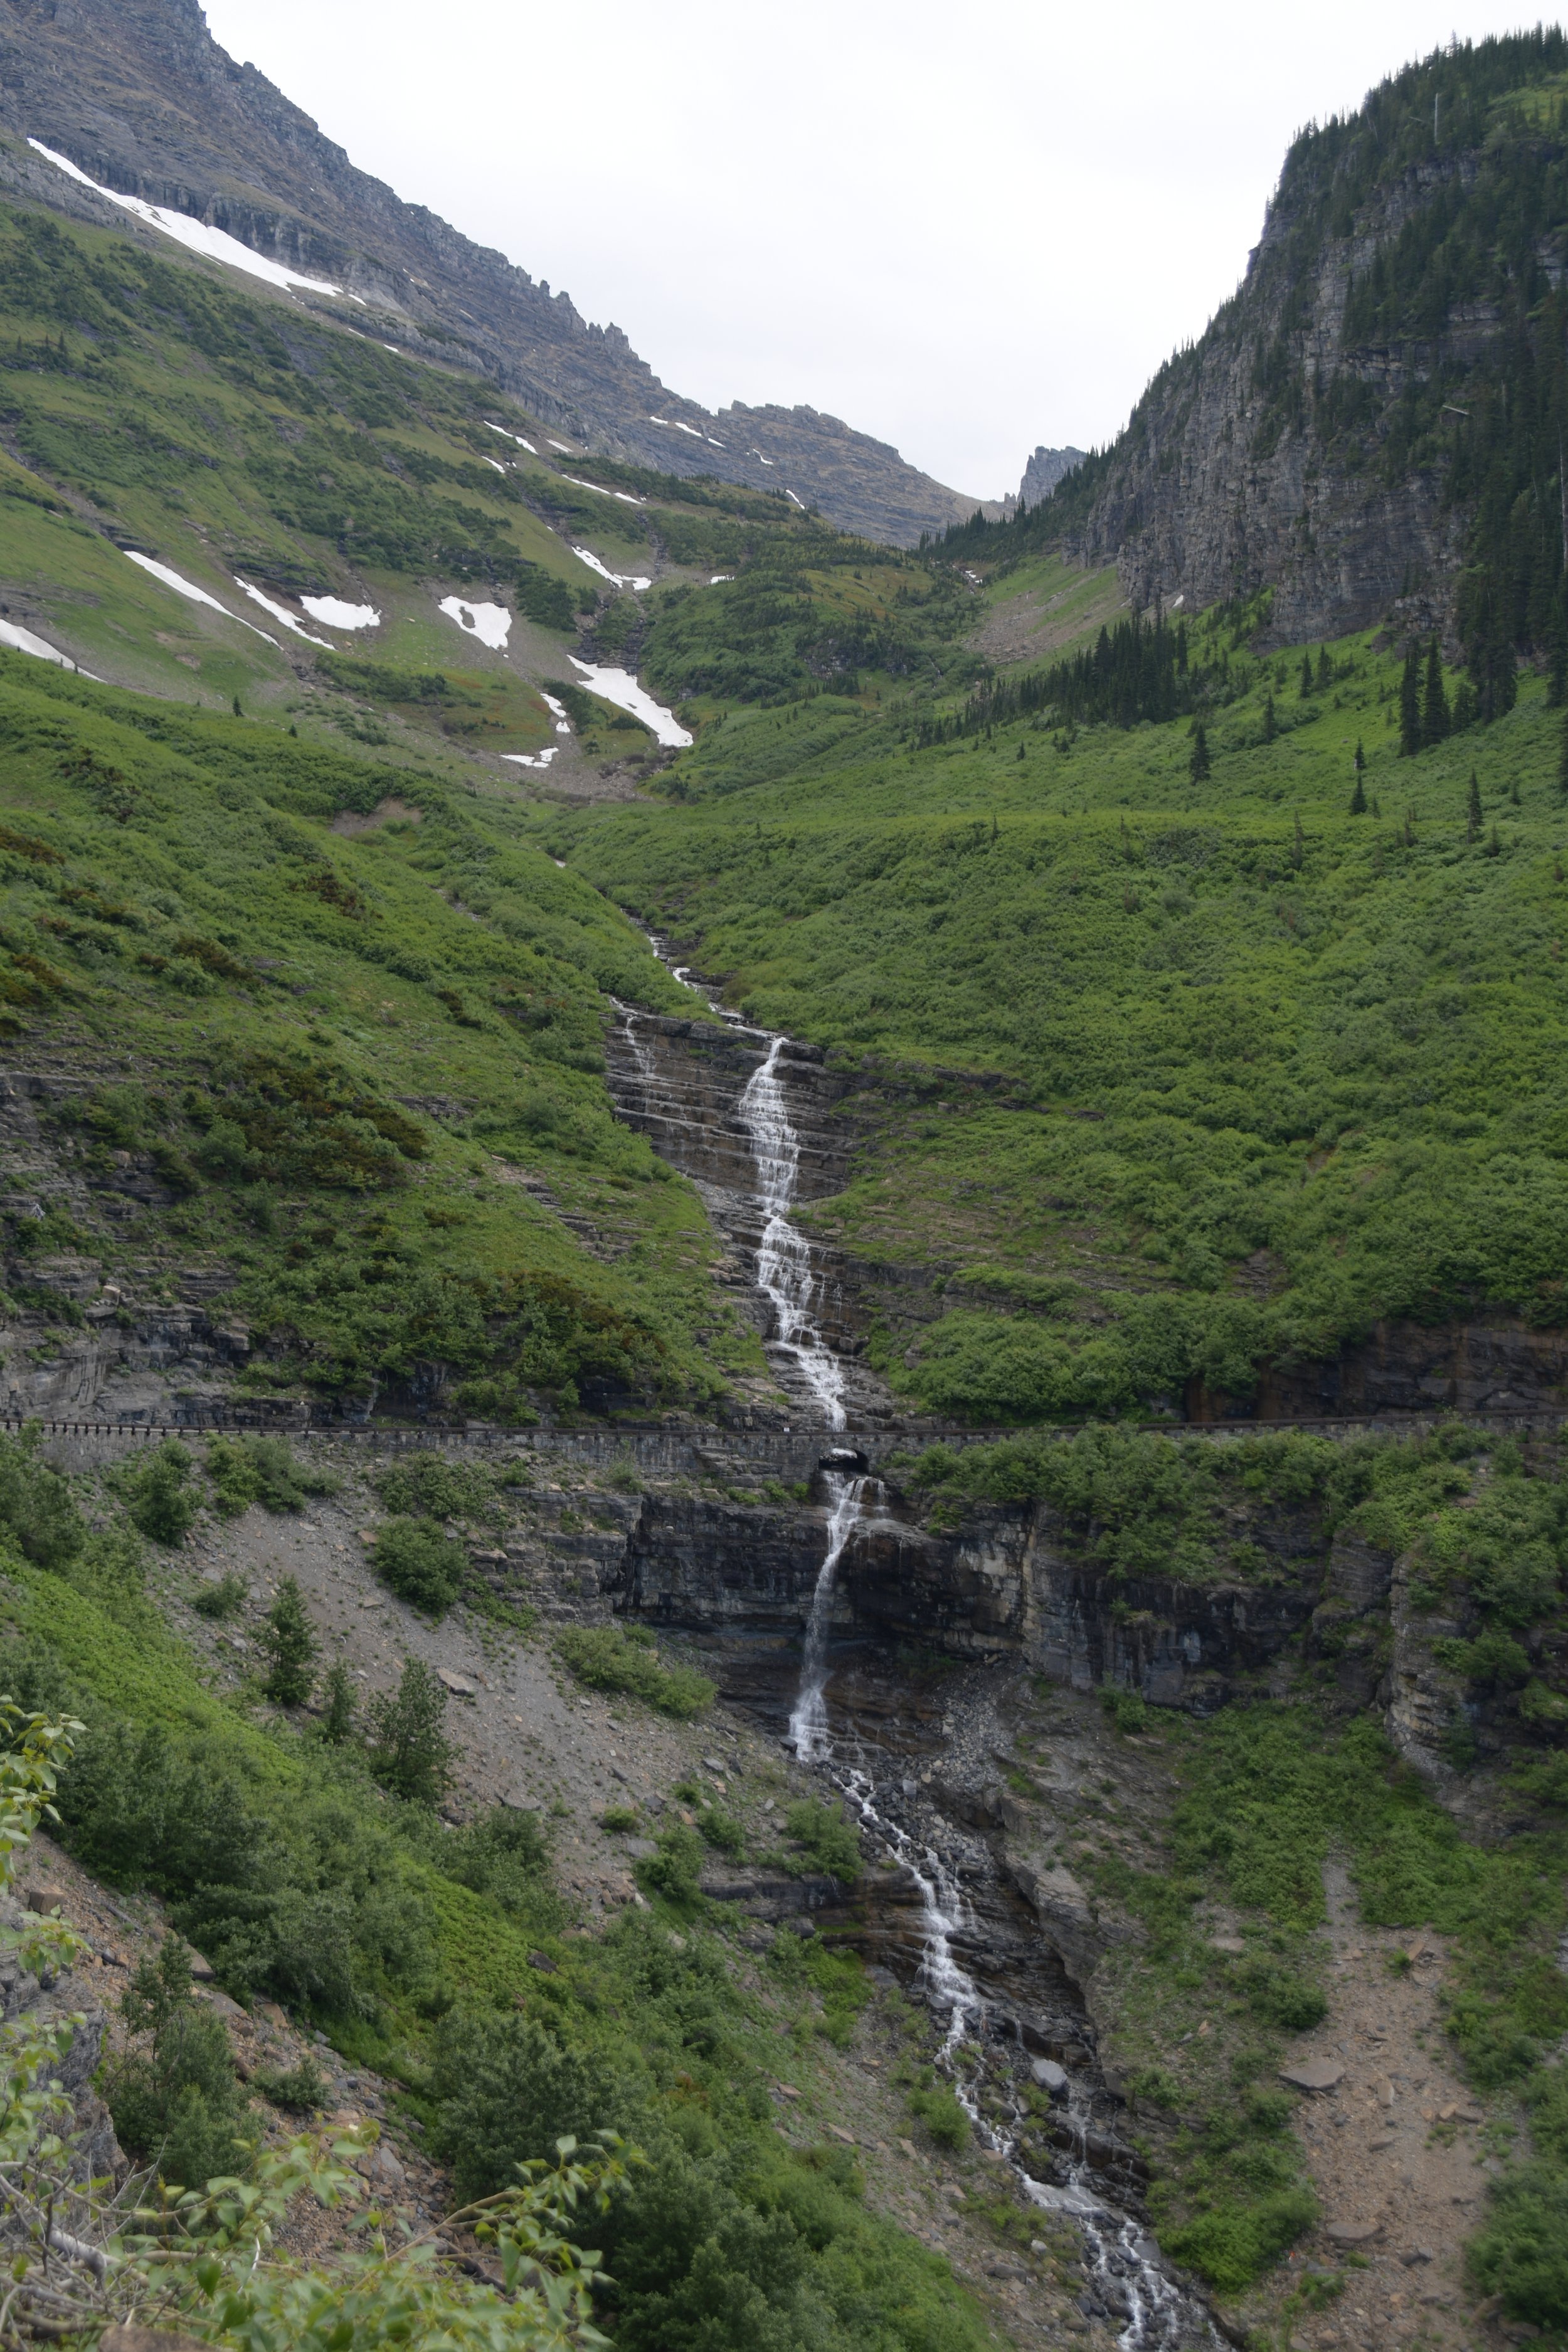
Travel Blog #12: Glacier National Park Day 2
travel though Glacier national park, logan pass heaven’s peak wiht a nikon f2. Montana

Road to the Sun, Nikon F2
Sadly, this is the last full blog for our 2023 National Park road trip. It was an amazing 2 1/2 week excursion and served as the final western US sampler trip for us. Going back into the park for day 2, we felt much better prepared for traffic and getting where we needed to be in a timely manner. We got up a little earlier and made it to Logan’s Pass around 8am. The drive up to the top was just as awe inspiring even though we had seen it all the prior day. Heaven’s Peak was magnificent and worth the few minutes to pull off and admire its grandeur. It was much easier to find a spot at the visitors center early in the day, maybe circling for 10 minutes feeling much less rushed. Most of us were still pretty trail weary from the Avalanche Lake hike the day before but were very much looking forward to spending a few hours hiking to Hidden Lake. We had a full day ahead of us, with a plan to start driving toward home once we were done.

Being in a place like Glacier National Park brings a set of hazards people don’t normally encounter. One of the biggest threats in the wilderness are apex predators, and in Montana that means bears. The morning we arrived at the trailhead the park service had made the decision to close it due to fish spawn activity, which also means bears were actively in the trail area. This was an unfortunate start to the day, one we were not willing to let ruin our last day in this majestic place. The disappointment in not being able to make the full trek was short lived once we looked past the trail map and realized we would still be able to make a full mile up to the trailhead and see a lot of amazing views. Even more importantly, as we crested one of the hills there was a family of bighorn sheep sunning themselves no more than 50 yards away without a care in the world. The U-shaped valleys were on full display for miles.


After spending an hour or two at Logan Pass, it was time to move on down the mountain toward the opposite exit. We had planned to stop for a few short waterfall hikes and ran into the very familiar overfilled lots and slow traffic trying to find spots. At this point we had resigned ourselves to being too tired to make any long hikes, but we did discover a very helpful traveler tip. The trailhead to St Mary and Virginia Falls was super packed. If you travel down the mountain back toward the East entrance, there is a lunch area with a trailhead which will take you past both St Mary and Virginia falls, in addition to one other I can’t remember the name of, on a 3 mile out and back trail with much less trouble getting a spot. This lot was literally almost empty with access to the exact same trails and had a decent set of restrooms. While we didn’t end up making the trek, it was an amazing spot to stop and eat lunch.

Our final stop was a small overlook a couple miles inside the park named Goose Island. On the map I had made some assumptions that the views would be outstanding because everything else here was. This is an excellent example of the National Park Service understanding exactly what the public wants to see. Leading up to the main overlook it does look very nice, but the official spot was a perfect way to end our day. The framing of the trees around the lake, Goose Island in the middle and snow-covered mountains in the background are literally the way I will remember this park for the rest of my life.

Travel Blog #11: Glacier National Park Day 1
Travel through Glacier national park with a Nikon F2

Glacier National Park is in my opinion the most underrated of all the parks we’ve visited. I never really investigated it since it’s so far north, and honestly even when my family lived out west, there was no real desire to spend any time in Montana. I can now honestly say Glacier is not “Montana” but a whole separate world that just happens to be inside the borders of Big Sky Country. At this point of the trip, I was willing to spend the money to stay inside the park and catch sunrise/sunset regardless of cost. There wasn’t really an option we could find last minute so we stayed about 40 minutes outside the west entrance of the park in Whitefish at The Pine Lodge on Whitefish River. They had THE best breakfast bar of all the places we stayed. There are only so many mornings you can eat the same eggs, sausage/bacon, and biscuits before you settle for a bowl of oatmeal and a banana. My traveler tip for this day is make sure you fill your tank in town. When we were there, it was $0.40/gal less than even a few miles down the road on the way into the park. Tip number two: you will need to get a pass in advance to travel the Going to the Sun Road during peak season, but there are plenty available.

The morning we left was a gloomy overcast day with a 100% chance of rain. I had saved film for this particular situation. It’s a black and white roll repurposed from old ATM machines called Street Candy. It is super grainy and not very contrasty, making every picture have the vintage appearance I really wanted for this morning. I did take some digital as well, and I will post them later in a photo dump update. Since our first stop in the park was the main lodge at Lake McDonald, I wanted to capture everything to look the way someone visiting in the 1940’s would bring home with them. The lake in the morning was perfectly still as a loon settled in to fish for its breakfast. Meanwhile the snow melt was rapidly dumping the winter’s haul through the coldest stream I’ve ever voluntarily walked through.


The lodge was amazing as well. Walking into the lobby felt as though nothing has changed since it was constructed and decorated for huntsmen and their dogs. There are a lot of tours that start their journey here using the vintage buses we saw driving throughout the park. After admiring them up close we got back on the road as fast as we could to try and avoid crowds. Our plan to be inside the park and to our first trailhead by 8 am was not as successful as we had hoped. Much like Yosemite, there is nowhere near enough parking and there are more people trying to park at the higher profile stops than there are spaces. Fortunately, the views from the road are more than amazing and worth the drive itself.


After leaving the lodge area we headed to what was supposed to be a simple hike. Trail of the Cedars is a well-manicured dirt trail and boardwalk. It’s an easy trail and only a little over a mile for the full loop. It feels like a very typical Montana forest, beautiful and dense but plenty of foot traffic so you never feel isolated. About halfway through this loop is a breakout for the trail to Avalanche Lake. By the time we got there it was already raining and we foolishly made the decision to skip it for now and come back on our way back down the mountain. Please do not make this mistake. Pack a poncho, water and snacks. Finding a parking spot once is hard, finding another later is almost impossible.


As we made our way up the mountain the views were getting exponentially more awe inspiring. It was difficult not to stop at every pullout and gander, but we wanted to make it to the top before it got too busy. This is a good time to mention that any time after 7:00 am is busy at Logan’s Pass (the main stop in the middle of the park). We did stop at the Heaven’s Peak switchback as well as multiple other pull-offs. The highlight of the trip going east was a rest area. They built the restroom into the side of the mountain providing plenty of parking and ample views of the valley. This was also the cleanest, best ventilated restroom in the entire park, including “civilized” bathrooms, so be sure to stop and stretch your legs a bit while you enjoy the views and eat lunch. There was also a friendly marmot begging for food and attention while we were there.


After spending a couple hours on the road to the top of the mountain we arrived at the Logan Pass visitors center parking lot. It was around 11:00 am, and we were late apparently. We circled the parking lot for at least 30 minutes along with a couple dozen of other drivers doing the same. People were creating their own spots along curbs, and there were others that just gave up and drove down the mountain to other pullouts within walking distance. There was at least one hike we wanted to do here, but the frustration of trying to find a spot forced us to give up and head back down the mountain, vowing to do it the first thing on day two in the park. We did see a mountain goat and her baby at one of the lookouts, so not all was lost. As we headed back down, we made two final stops for the day. Red Rocks was the easier of the two and was a lovely stop we hadn’t planned on. It’s right on the roadside with a small set of steps to get down to an overlook of a beautiful set of rapids and falls with rock outcroppings. You can also step off the trail and scramble down to get into the water without much effort. We spent some time just relaxing and checking it out before we headed to our last stop of the day…Avalanche Lake.

As I mentioned before, finding a parking spot a second time in a high traffic area was abysmal. We circled for 30 minutes, in multiple lots, multiple times. I felt like giving up and we sat in the car in a one-way loop until finally someone had enough for their day, replacing them instantly. Did I feel like I was prepared to physically fight someone if they tried to take that spot? Yes. I am convinced I would have thrown hands at that point. Thankfully the hike was worth it, and I’m glad I don’t need to do it again. The hike itself was difficult: rough trail, rocks, logs, roots, and elevation change. It was 2 miles one way and I wanted to believe the end result was worth it. It was. I don’t have anything to write about Avalanche Lake. These photos say it better, so here you go….


We ended the day by stopping near the park entrance for ice cream at Eddies café and gift shop in Apgar Village. We heard from so many people it was a must do, so I assumed it was probably one of those overrated tourist things. It wasn’t though. They make very good ice cream and after spending 4 hours on the most difficult trail we had been on this year I was very happy sitting, eating a “single” of Huckleberry ice cream. Unless you’re a teenage boy, a single is enough, even if I don’t know you, a single is enough.

Travel Blog #10: Olympic National Park Day 2
travel through Olympic National park, Ruby’s beach, Spruce Trail and hall of mosses

Ruby’s Beach, iPhone XR
Going back to Olympic for a second day, we realized the stark difference between this and so many other parks is easy parking. Because it’s so massive and there are so many different areas to visit, the parking lots are easy to access. The longest we had to look for a spot here was making a second loop, so maybe just an extra 2 minutes after dropping everyone off near the visitor center. Speaking of Visitor Centers, the official Olympic National Park shops don’t have a great amount of interesting stuff. The place we purchased ours was Peak 6 gift shop. It’s owned by a couple older ladies that are very entertaining to chat with and know a lot about the area. It’s got a lot of supplies if you need anything for camping or hiking that you forgot at home at very reasonable prices. It’s just off the road heading into Hoh Rainforest on the left side. You’ll know you’re in the right place when you see a couple life sized stuffed bears having a tea party out front.

Hall of Mosses, Nikon F2

Hall of Mosses Ferns, Nikon F2
Driving into an area described as a rainforest, I genuinely didn’t know what to expect. I kept picturing toucans and monkeys for some reason. I know Washington isn’t the same as the Amazon Basin, but I’d never knowingly been to one before. As I soon learned, rainforests are pretty much the same as regular forests but more moss and a little extra humidity. We decided to do the two loops heading out from the main trailhead, Hall of Mosses and Spruce Nature Trails. Both start from the same place, and then branch off in opposite directions. Hall of Mosses seems to be the more popular of the two and for good reason, the greenery is amazing! It’s a very accessible trail: nice, easy, well maintained and not a lot of elevation change. We made sure to go out on all the little loops and that is where the highlights are. It’s hard to really capture the colors and size of this place on camera. Even on the dry day we were there, it seemed like some of this moss would drip water if you grabbed it. If you only have time or energy for one hike on this side of the park this is a good one and only takes maybe 30-40 minutes if you go slow. For a little more adventurous walk, make a right at the fork and take the Spruce Nature Trail.


Spruce did not have nearly as much moss, and the hike was a little difficult but was more fun with a varied scenery. At this point of the trip, we had become a bit desensitized to beautiful views, and we were moving through a little quicker than we would have been earlier in the week. One of the signs we saw for a longer trail coming off ours mentioned frequent bobcat sightings…I kind of wish we had seen one. The trail was a meandering 1 ¼ miles with a breakout near the river about halfway through. The water here was so clear you could see the bottom even across at the other bank. I’m not sure it would be safe to drink, but the Ranger I talked with for a minute didn’t seem to think it would be the worst idea when I made a joke about it. Getting back to our car after this was one of the only times I felt like we hadn’t spent enough time on the park. There is just so much to see and do, and we had only been in for about 4 hours. Thankfully we had one more stop, and we wanted to get there before the weather changed. There was a possibility of rain and Ruby’s beach was almost an hour drive away from the middle of the park where we were.

Spruce Nature Trail, Nikon F2
Riverside, Nikon F2
Ruby’s was probably the most free-spirited part of this park. There is one main lot to get to it, and it was busy. The path down to the beach itself was paved but it’s quite a hike to get down to the sand with lots of switch backs and multiple exits off the path. Even if you don’t want to go all the way down, the view from the top is worth a stop. The weather had changed drastically over the hour between Hoh and Ruby’s. Fog was heavy and everything seemed to be shades of grey, so I loaded a roll of Black and White to try and take advantage of the contrast. Not a single shot turned out, I underexposed all of them. I thought for sure this was going to be my Ansel Adams moment, where I would be selling these photos well into my retirement and people would be lining up to view them in museums. Now I need to go back and reshoot all of them. This is also the reason I took a digital camera and phone just in case. The driftwood was everywhere, thousands of stark white sticks and logs. Tide pools held small fish and we even saw a tiny urchin stuck in a pool on a boulder three feet above the beach. I’d love to see this place at high tide someday and relax on a sunny day in a beach chair.


The plan from here was to drive straight to Mt. Rainier and spend the following day exploring before heading to Glacier National Park. When we looked online to find a place to stay, we discovered not only would we be driving another three hours out of the way to get close, we would also have the privilege of spending $500 minimum to sleep in a basic hotel room. We spent a few minutes debating whether it was worth the trip, then headed west toward Glacier when we also saw it was going to rain all day. I would really love to see Mt. Rainier some day and maybe I will, but I won’t spend $500 to sleep regardless of how cool a place is.

Travel Blog #9: Olympic National Park Day 1
travel through Olympic national Park with a Nikon F2

Lake Crescent, Leica M2
I have read numerous reviews of Olympic National Park and how remarkable it is to have three distinct ecosystems in such a small area. One thing I hadn’t read about as part of these articles and reviews is how the park roads are set up to keep them separate and there’s not an easy way to go from one to the next. The basic structure is a giant circle with tendrils drifting into each attraction or area, completely disconnected from the rest as a separate adventure. Olympic has plenty of accessible areas, but this was probably the least accessible for people with mobility concerns to see the good stuff. Trails are rugged, muddy, and generally will need to be hiked by someone with some endurance to make it out and back.

Olympic Trail, Leica M2
Day one we decided to concentrate on the 2 main waterfalls: Marymere and Sol Duc Falls. They are not the most spectacular waterfalls we saw on the trip, but at this point it was about the hike to see them and getting to experience the Mountain Forest. Being there early, the lakes were serenely calm and the temperature was that perfect crispness where you almost need a long sleeve shirt but not quite. For some reason I decided to shoot Black and White on the trip to Marymere Falls, and most of them turned out well but did not show how beautiful the greenery was. They were also almost all underexposed which made it look like we were hiking through a stormy day. I’ve now learned a little better how to shoot in woods with deep shadows and bright sun at the same time, but not this day.
Marymere Lower Falls, Leica M2

Marymere Upper Falls, Leica M2
Getting to Marymere was a lovely hike alongside a creek. It looks like it probably crests several feet higher in the spring but while we were there, we could have easily waded across it. There are plenty of signs asking you not to do it though as it would disturb nests the fish have laid their eggs in, and they provide a sturdy bridge that brings you to the base of the falls. The trail to the falls itself is a somewhat difficult loop. It’s a steep dirt trail, but easier if you follow it counterclockwise. This brings you directly to the top of the falls, and then you can take a few flights of very steep wood and dirt stairs down to the lower part of the falls. It’s not unsafe in any way even if does feel a little treacherous at times and very worth it to visit both. That being said, my personal favorite part of this hike was crossing on a felled tree which was cut in half to make a bridge. It was very sturdy with handrails which makes me believe it was fully intentional, but it did make it feel a little more adventurous.

Olympic SolDuc trail, Nikon f2

Behind SolDuc Falls, Nikon f2
Leaving the crisp mountain hike and driving across to Sol Duc Falls was so drastic it felt like two entirely different parks. Sol Duc is kind of the poster child for the park. Photos of it are on all their marketing and most of the merch at the park stores. Getting from the trailhead to the falls wasn’t too terrible with the trail itself being well maintained and has a few nice sets of stairs to get up and down elevation. The forest was so green and mossy I thought this was considered their rainforest…it’s not, but if you only have time for one thing to do at Olympic this would be my first choice. There is a very cool bridge crossing high over the river below with a perfect view of the falls. It’s a bit wet and most of the people crossing over it stop for pictures, so expect to wait a few minutes for your turn. This was also the place where I finally saw someone shooting an analog camera for only the second time this trip. I honestly had expected to see a lot more people shooting film so I would feel like less of a weirdo using a 60-year-old setup. If you have the time to stick around it’s worth spending a few minutes to walk past the recommended viewing area, the bridge, and scramble down closer to the water for the view. The roots of the trailside trees hold the soil in such a way it makes steps to get down and doesn’t take too much effort as long as you have a reasonable sense of balance and leg strength.

Nikon F2

Nikon F2
We wrapped up the day a tad bit early and headed back toward the hotel and spent a little time shopping at the thrift shops around town in Sequim, where I bought a completely unnecessary digital camera just because it looked cool. They also had a pink hamburger stand in the middle of town named Tootsie’s with what I’ve been told was an amazing gluten free, soy free burger near the old mill. If you’re traveling through and need a recommendation, the Comfort Inn has fresh cookies every night and a super cool group of staff that will visit your website if you chat with them and give them a business card.

Sequim Mill, iPhone 12

Travel Blog #8: Redwoods to Crater Lake

Crater Lake Clouds, Leica M2
At this point in the trip, we were getting more than a little road weary. Getting into NorCal and off the coastal highway made things feel a little more relaxed, and we started planning a break day to sit around and do nothing. Today was not that day. The plan was to get from our hotel and at the very least get to Redwoods National Park. Of course, every road trip needs at least one stop for pictures at a tourist trap. I wasn’t watching for it, but I had to stop to see the Paul Bunyan and his friend, Babe, statues when we stumbled upon them. They are not significant in any real way, but one of my favorite YouTube photographers made this same stop and I literally only stopped so I could tag him on Instagram. I’m shameless and I don’t regret it. The parking lot at Trees of Mysteries was packed though, which makes me suspect it’s got at least a few things interesting enough to get people to stop and stay a while.

Paul Bunyan, Nikon F2

Babe, Nikon F2
Redwoods NP was a nice stop, but not something I would have necessarily gone out of the way for. Of course, we had just spent a day recently in the other “big trees” park and I’m sure that played into it a lot. It was beautiful and the one hike we went on was relaxing and not very difficult. We went through Ladybird Johnson Grove. It was about 1.5 miles around the loop and the only accessibility issue I saw was the flight of stairs to get from the parking lot up to the bridge that leads to the trail. The density of the trees was incredible, but light has no trouble getting to the forest floor. Moss hangs from trees and little wildflowers grow on fallen branches everywhere. It was also peak season for the rhododendrons to be in bloom. The absolute coolest part of the hike is all the hollowed-out trunks of still live trees. Big enough for adults to walk into and cozy enough you could stay warm inside if you had to camp overnight and didn’t have anything to cover yourself. Our time in the park was shortened due to construction and the other hikes being a little further out than we wanted, but we made sure to spend plenty of time at Enderts Beach.

Redwood NP, Nikon F2


The beach is just a few miles from the main part of the park, and there is a 3-mile hike we had wanted to do but the trailheads are not clearly marked…so we ended up being at a parking lot right at the beach itself. When I think of a stereotypical California beach, this met every single bit of my list. The waves were coming in gently, the wind was persistent and cool, and the views were so incredible. It was a place full of activity and life, but I didn’t feel rushed or like I needed to do anything besides sit and let all of it wash over me. We collected rocks and driftwood for a couple of hours while watching families, dogs and even a horse just walking down the surf. Once we felt sufficiently replenished, it was time to hit the road again. This is also the time I remembered I needed to actually touch the Pacific Ocean.

Kites Over Pacific, Nikon F2

Enderts Beach, Nikon F2
The plan for the rest of the night was to check into our hotel and “tomorrow” we would go to Crater Lake. We were staying about 90 minutes away and it seemed like a good way to start the day. Once we got into town and checked in, we did a little more reading. Crater Lake has clouds covering the view approximately 50% of the year. The night we stopped it was clear and it was supposed to rain the next day, so we made the decision to be a little more tired at the end of the day and make sure we got to see it while we could. Late June is apparently still time for deep snowpack in the park. All but one spot on the south end was still closed. It was literally freezing there. I wore the one sweatshirt I brought with my rain jacket on top, a winter cap my wife insisted we would need at some point, and I was still cold. Getting to only see the views form one spot was a little disappointing, and I would really like to go back and take the hike down to the lake itself on the far side of the crater. Like all the other places closed while we were there, it all opened in full the week after we got home.

Crater Island, Nikon F2
Crater Cottage, Leica M2

It was a nice relaxing drive back to town where I discovered my hands down favorite fast-food burger. I have heard for years In-N-Out Burger is better than anything we have in the Midwest. I got a Double Double (double burger, double cheese) “Animal Style”, which I think means everything plus grilled onions, and I can say in full honesty I have never had a better burger in a drive through. If you see a sign out west for one of these places, please take the time to try it.
The next day was our day of doing nothing around the hotel, recharging for the rest of the trip.

Travel Blog #7: California Coast Rte. 1
traveling up california route 1 with a Nikon F2

Driftwood Beach, Nikon f2
A 5-hour drive is not something I would usually take the time to write about, but when it ends up being a 12-hour side trip, it’s worthwhile. We made the decision to bypass the more direct expressway route and travel north along the California Coast State Route 1. In some parts it’s also called the Pacific Coast Highway (PCH), and for us the trip started in fog at The Golden Gate Bridge in San Francisco. While it was cool to see the bridge and Alcatraz Island, we were really looking forward to seeing the Pacific Ocean and the scenery changed quickly north of the city. Driving through this part of the state felt vastly different than the first part of the trip, leaving the arid behind and welcoming rolling hills and scenery everywhere. When we stopped in Bodega Bay there were signs everywhere advertising Dungeness Crab, fishing supplies and trawlers tugging through the calm of the day. It was also the place I bought a bag of chili coated mango strips. The lady at the gas station said they were an amazing local treat, I’m not sure I agree. Maybe they’re an acquired taste.

Bodega Bay, Nikon f2

Just outside the town we ran into the first of many beaches. Seeing the Pacific Ocean for the first time was glorious. There were surfers out on the swells and families wandering the sand. There is a turnout for a beach every couple miles along this road, and if you like going to the beach you could happily spend a day at any of the dozens we saw.

Doran Beach, Nikon f2

Doran Surf, Nikon f2
Black Point Beach is the first we stopped at but didn’t get far into the walk. It looked like there was about a mile to the beach and we needed to keep moving. There were also multiple signs stating this is one of the most dangerous beaches in the state due to waves and undertow, so we moved on. If we were going to be walking a mile to touch water, it should be reasonably safe to do so.

Doran Beach, Nikon f2
The beach we did stop at was every bit worthy of being called majestic. Aptly named Driftwood Beach it was easy to understand why when we finally go down to it. About halfway there is a beautiful tunnel through a grove of over-arching trees followed by a flight of wooden stairs down to a packed dirt trail. The whole stretch leads to an incredible view. The beach is littered with more driftwood than I’ve seen in one place, enough to build a small hut if you wanted (which someone had). At most parks it’s not allowed to remove vegetation or rocks so I took a minute to see how illegal it would be for us to gather the driftwood I knew we would be taking home with us. According to the California State Park website, visitors are allowed to take no more than 5 pounds with them. We spent about an hour here just wandering around and then out to an overlook that separates two beaches. If you only have time to stop for one beach on Rte. 1, you could do a lot worse than Driftwood.
Driftwood Overlook, Nikon f2

Tunnel, Nikon f2

Driftwood Beach 2, Nikon f2
The rest of the day was more amazing views, cute little beach towns with BBQ trailers and more switchback roads than I’ve ever imagined could be stuffed into miles of road. The speed limit through most of this part is 55 mph. I don’t think we were able to even go 30 mph most of the time. The speed limit signs should all say “55”, but it was beautiful and I’m glad we took the detour. An RV or pull behind trailer would be a tough drive, but there are campgrounds on bluffs over the ocean I could see myself pulling over to spend a day grilling, drinking a local beer and watching what would be an amazing sunset. If I were to move to California, one of these little towns would be a dream.

Harbor Seal Nursery, Nikon f2
We ended the day in Arcata, just north of Eureka after a lot of searching for a safe town to sleep. This was the first time we saw a publicly available patch of green grass in nearly a week. Grass typically isn’t something I’m particularly happy to see, but this time it meant hopefully there would be a little less dust for at least that day. Traveler’s Tip: on our journey we were all craving pizza and the first real city we came through between San Francisco and Arcata was Fort Bragg. While it is a chain restaurant, they do make a very nice pie. Even better they make a really good Gluten Free/Soy Free pizza and were very friendly while I was waiting. It’s a little expensive but was well worth a stop in the middle of the day.

Travel Blog #6: Yosemite Part 2
Travel Through Yosemite National Park with a Leica M2

Ansel Adams Gallery, Leica M2
Leaving our parking spot after our hike to Vernal Falls was a terrible mistake. We had heard parking was difficult, but had no clue how hard it would be to find something close to our next destination. We were about a mile away from Yosemite Village and figured we would pop in, spend a little time at the Ansel Adams Gallery and then head out to the Lower Yosemite Falls trail. Instead, we spent the next hour driving and circling in every visitor parking lot we came across. There is not enough parking in this park, and the NPS.gov website recommends finding a spot before 8am and remaining in that spot. If we had paid attention to that we would have walked only slightly further than we drove.

After finally finding a spot at what I think was the Ahwahnee Hotel, we were on our way. There is a large section of the lot that is hotel parking only, but on the two extreme ends it is open to everyone. Other than the parking situation this was the absolute highlight of the trip for me. The walk back to the village was about a mile, and it took us past the two main things I had wanted to shoot with my Leica. Before we left, I took some time to relearn how Ansel Adams shot Monolith, and basically it was his usual film with a deep red filter to darken the sky. About halfway to the gallery I was able to get the exact angle I had been looking forward to. Beforehand, I had honestly not looked at any maps to know where it would be, so I am so happy I saw this piece of rock and it looked every bit as majestic as I imagined. I took this same photo with a bare lens, a yellow filter and of course a red filter. As I suspected, the red filter version is my favorite and could be my favorite photo I’ve ever taken.
Half Dome, Leica M2
Getting to the gallery was literally a dream come true. I made sure to look at the other artist’s prints first and they were amazing, but when you’ve been looking forward to seeing something in person for 30 years, those extras are simply a distraction to the main event. Unfortunately, they do not allow photos in there…but I snuck one of the display cases with his original equipment (one of the employees didn’t seem to mind). It was kind of a humbling experience to be standing in front of prints he had made and signed himself. They still have his original assistants come in several times a year to make new prints from his original negatives but were sold out of the one I really hoped to bring home. They had the original Moonrise over Hernandez available but spending $79,000 seemed like a poor investment on my part so I left with a small reproduction and 4 postcards. If we ever go back, I think I will try to convince my “financial advisor” it would be a wise investment to get one of the museum prints if they have them available. One of the curators, Ken, was listening to me talk with one of the other customers about this blog (he was also shooting film in the park) and then he spent the next 45 minutes walking me through the history of several of the photos, showed me details about a few of my favorites I had never seen and generally gave me a masters class on Ansel Adams’ life I never expected when I walked in the front door. If you ever have the chance to go talk with Ken, plan on spending at least an hour with him and be prepared to learn.

The final planned part of the day was Lower Yosemite Falls. The paved trail is an easy and accessible loop. I believe it was about 1 mile and there were so many different spots with amazing views it’s hard to choose a favorite. Most places you’re only able to see either upper or lower falls, but in a few you can see both. Then when you get to the bridge over the river it feels like you are standing right inside the falls. It’s a few hundred yards away from the bottom but the spray is incredible and was really fun to stand in. I didn’t spend much time on the bridge because my cameras aren’t weatherproof. But if you aren’t worried about it yourself, please take the time to stand there and let one of God’s great creations envelope you. I would love to make the 8-mile hike to Upper Falls someday, and if we get back there to see Glacier Point it will be right there at the top of my list.
Yosemite Falls, Leica M2
As we were going back to the car, we were trying to figure out what souvenir we wanted to remember this trip by. One of the guys we were walking near recommended the gift shop back at the hotel and we weren’t disappointed. It was definitely the best selection within the park, and for those of you that are going to camp there they had a really nice selection of local beer available.
On the way out of the park traffic was light. It seemed like once we got past Yosemite Falls there wasn’t nearly as much crowding. Plenty of spots on the side of the road and in pullouts. Since the road through the valley is just one big loop, it put you right at the base of the mountain and can get incredible views of El Capitan, Three Brothers and what I am pretty certain is the Merced River. If you have time at the end of your day to stop and watch climbers as the sunlight turns to Golden Hour, it would be worth the time to sit and have a snack for a while. I was able to get a few shots with the experimental film I had in my Nikon, and I really like the way they turned out. I waited 30 years to be in this valley and it was worth it. I cannot wait to get back there because we barely scratched the surface of how awesome this place is due to the multiple road closures from snow and road work.

El Capitan, Nikon f2, Retrochrome

Three Brother, Nikon f2, Retrochrome

Travel Blog #5: Yosemite Part 1
Travel through Yosemite national park with a Leica m2

Vernal Falls Trail, Nikon d500
Fall 1995 is the first time I had ever seen a photo which made me know I had to visit anywhere. When my roommate and I went to a friend’s off-campus apartment during welcome week at Michigan State, he had a poster of Ansel Adams’ Monolith hanging and I immediately was taken by it. To say that poster has been influential in my desire to travel would be an understatement. I had no desire to go to California beyond maybe a trip to the beach or see a baseball game. Seeing that poster put Yosemite at the top of my “must do” list once I was able to afford it. 28 years later, I was able to see the same mountains and falls Ansel Adams spent much of his life photographing.

Not taking this trip lightly, as it may be a once in a lifetime occasion, I made sure to brush up on the few things I knew of how Adams shot this park. I didn’t want to copy his images, but I did want at least a few of mine to show how much his work has influenced how I try to look at scenes. He didn’t shoot color because he said it took away from the power of the image black and white makes. He tried to make clean, clear, “pure” photos and that’s what I wanted to do. I don’t have a large format camera like the 8x10 Graflex I’ve seen pictures of him using. But I did read a blurb of him using a Leica Rangefinder and that is what I knew I would be using along with the sharpest lens I own, a Leitz Summicron 50 mm f1.4. It is the most basic camera I have and being from the 1960’s could absolutely be something he would have shot while walking home from his workshop or hiking through the park.

We spent the night outside the park in Oakhurst, and our hotel was right next door to a small Gallery by the name of Firefall. I hadn’t planned to stop in, but I was bored and the thrift shops around weren’t exactly “thrift prices”. The owner greeted us, and we chatted about the park for just a few minutes, giving me possibly the best insight to visiting and I am passing it on to you now. Get there early, when I mentioned we planned to be at the gate around 6, she said, “that should still be OK” and honestly, I’m not sure we got there early enough.

Vernal Falls, Nikon d500
Yosemite was by far the busiest place we went on any part of this vacation, and if you find a parking spot, just plan on leaving it there the rest of the day and taking shuttle buses or walking. This area of the park is just one big loop and the shuttle buses run regularly. Admittedly, the park service did say this was one of the most visited months and had just under 66,000 cars come through the gates. If that makes you not want to visit, I wholeheartedly still highly recommend spending at least a day at what I consider one of the most amazing places I’ve ever been. We spent the day there, did three hikes and left the park exhausted feeling like this is a place we need to come back to again someday. The only disappointment for me was Glacier Point being closed due to snow (amongst several other areas), which reinforced the need for a return trip.

Yosemite Entrance, Leica M2
I had high hopes for Yosemite, but I have learned to temper by enthusiasm for the first few stops of parks…this does not apply here. When you see the sign for Tunnel View, just plan to stop immediately when you exit the tunnel. The left lot was packed which is where we stopped, the right-hand lot was half empty and would have been much easier to exit. The sun was coming up and the valley was still covered in fog. I don’t generally like sun flare in my photos, but I knew there was nothing I could do except try to minimize it and maybe “place” it in an aesthetically reasonable spot in the frame. From here we were able to see the two main peaks in the park (El Capitan and Half Dome), and I think if we had stopped on the right side, you could possibly see Three Brothers and Horsetail Falls as well.
Tunnel View, Nikon d500

Tunnel View Half Dome, Leica M2

Tunnel View Half Dome and El Capitan, Leica M2
This day was off to a great start, and after we got onto the main road through the park, we pulled over maybe a half mile from where we came through Tunnel View to get our first up close view of El Capitan. We didn’t see any climbers (with binoculars), but we were told they were there most days. The sun was hitting El Cap just early enough it didn’t quite destroy the shadows, and the Merced River was swollen with snow melt, engulfing the base of the trees on its banks. This is the first spot I’ve been and felt like any photo I took would be good, it was just a matter of thinking through what I wanted the end product to look like. The sun being behind me for these photos eliminated the flare I had showing up at Tunnel View, which made for a much cleaner picture.

El Capitan over Merced, Leica M2
In a perfect world, we would have been able to park at the base of our first planned hike to Vernal Falls. In reality, we parked at what I think is a campground overflow lot a little over a mile away. This was our first real experience with crowds. We circled for at least 30 minutes to all the parking lots and pull offs before we found a spot and got on our way. The hike itself was a 1.6-mile trek uphill most of the way, but it’s paved and there are plenty of places to stop and take a break while looking across the valley to see waterfalls and amazing rock formations. If I were to do this hike again, I would have kept going another 0.2 miles and gone to Emerald Pool, but I honestly enjoyed the whole trip up and on the way back to our car I got my first real view of Half Dome. It was at this point I remembered by wallet has the topographic map of the mountain laser engraved on it, so I made sure to snap a quick pic of that too. It’s silly but it seemed fitting, and maybe someday I should send it to the maker of the wallet. Based on what I’ve read since we returned home, I believe Vernal Falls is the first stop on the way to Diving Board where Monolith was shot, so if I ever go back I need to be prepared for the 8+ mile hike carrying a 5-6 pound camera and 8x10 sheet film that weighs a pound each, all of which I will need to buy and learn how to use. So, if you have a Graflex Super Graphic just sitting in a box in your basement, let me know sometime in the next 20 years.


More to come next week about Yosemite, including the two best photos I’ve ever taken. See you soon.

Travel Blog #4: King’s Canyon & Sequoia National Park
Travel through Kings Canyon and Sequioa national park

Panoramic Point Overlook, Nikon d500
Traveling from Death Valley to King’s Canyon and Sequoia National Park was the most drastic day to day change we experienced on this trip. When we left Death Valley, it had just gotten to 101 degrees F, and when we arrived at the northwest gate of King’s Canyon, the thermometer in the car was reading 56 degrees. The drive from the hotel was incredible as well, passing through massive orange and olive groves. Gas stations were clean, and people were friendly. Unfortunately, large parts of Sequoia National Park and the entrance we had originally planned to use were still closed due to residual snow. What we were able to visit was amazing, and easily accessible too. Due to the closures, this was one of our shorter “in park” days, but it was worth the half day to see it.


Getting to the park, we weren’t told ahead of time we should get there early but we did, arriving around 9am. The main draw for us was to see General Grant, the second largest Giant Sequoia in the world (33 ft in diameter). Accessing the trailhead was incredibly easy. The park service knows when they need to make something simple to get to. If you take the main trail clockwise, you can see a direct view of the tree in its entirety after only a few hundred yards. The trail is paved well and people of any age and ability should be able to get there without any issue. General Grant is the only living object in the United States recognized as a National Shrine, and when you get to see it up close there is a majesty that makes everything else just feel so small.

We took the trail counterclockwise which was only slightly challenging with mild inclines and a few switchbacks. This would be the way I recommend, because it lets you see a few interesting, felled logs (big enough to camp in) from the top first and gets you to the more pedestrian views eventually. I do think if I would have taken the trail in reverse I wouldn’t have been as impressed as I was for this pretty short trip. There is also a very accessible section to clamber up some hillsides and climb on fallen trees, stumps, and boulders. There were so many kids running around it felt like a backwoods playground. This is also where you can first see a little bit of not just General Grant, but where part of it was scarred by fire. There are many scarred trees in this park (and the Redwoods) and it’s hard to imagine how big these fires have to be to destroy such massive behemoths, yet General Grant still stands.
General Grant, iPhone
The only other major feature we went to was Panoramic Point Overlook. If you want to see this (and I highly recommend you do) make sure you use the map the Ranger station provides. We did not see any signs for it, and I suspect there are a lot of people that miss out on this or arrive later than planned because there just isn’t a sign that tells you where to turn off the main drive. The trek to get there felt a little dangerous, and it’s probably impossible to try with an RV or anything larger than a Yukon or Escalade. Once you pass the campground, the drive is steep and has some of the sharpest switchbacks I’ve ever driven. There was still melting snowbanks on the side of the roads making little creeks across the path and several spots were only wide enough for a single car. We got there early enough for traffic to be light, not encountering anyone trying to come back down yet.

After a few miles we arrived at the trailhead, and it felt like a different world. The trees were not as big as in Grants Grove, but they were beautiful and ethereal. The damaged trees looked like they were coming alive with white tentacles and there was plenty of moss, which to me means it doesn’t get much light. The trail is paved and moderately steep incline. The trail map shows there are two ways to get to the viewpoint and makes it seem like they are separate…they aren’t. If you take the trail to the left, it’s a steeper but shorter half mile walk. It’s very accessible though and has plenty of spots to take a break. The lower viewing area is nice, and honestly, I thought it was worth the trip, but then there is a higher viewpoint accessible for only the cost of a hundred yards or so of more hiking. This is the spot you need to get to. There is much more room to move around, and the angles are just slightly better and allows you to get a panorama of the Sierra Nevada, and an incredible lake I couldn't find the name of. This was the first spot on this trip I considered might be the place I would take a photo for an art show I plan on entering this year. I had expectations for this to be a nice spot but had only taken a film camera for the hike. Once we got back to the lot, I knew I needed to go back with my digital because I wanted to guarantee I got the shot on this one. It was an energizing walk.

Panoramic Point, Nikon f2, Retrochrome
For the walk back down, we decided to finish the loop which made a 1-mile hike into a 1.5-mile hike, but the inclines were easier. Accessibility wasn’t quite as good though. It was only partially paved and there were several spots with fallen trees blocking the path. Easy to hop over for us, but if you have someone in a wheelchair or limited mobility it would be next to impossible to get past this section.


Our day in Sequoia was short and challenging from a photography perspective but absolutely worth the time we spent there. I do not recommend Black and White shots here, the combination of high sun, low light under the canopy and variable shadows were very hard for me. I got a few “okay” shots, but color showed best.


One final note, we got there around 9 am California time and had no trouble getting in. On the way out, the line had grown exponentially, and the “your wait time from here” signs on the side of the road showed people would be waiting at least an hour just to get to the entry gate. If you plan to go, make sure you get there early and check the nps.gov website for weather and closure updates because it changes fast.

Travel Blog 2023 #3: Death Valley
Travel through Death Valley National Park with a Leica M2
Badwater Basin, Leica M2
Our second main stop for this trip was THE hottest place on planet Earth: Death Valley National Park. The day we were there it was not a record-breaking day, but it was 101 degrees fahrenheit by the time we were ready to leave at 1:00 PM.

We were up and ready to leave the hotel and make what we expected to be about an hour drive and get there just after sunrise. Travelers tip for this park is the 2 resort Hotels inside the park are nominally more expensive than the ones an hour outside the park. When I checked the night we stayed it was only about $20-30 more for the rooms inside the park, but we were already unpacked and settled by the time I saw it. The drive into the park though was quite incredible with the sun coming up slowly behind the mountains. Local traffic was not patient with us as we observed the 70-mph speed limit though. Once we were past the few businesses in the area everyone was passing us to get to and over the first set of mountains, it truly felt isolated. Driving in through the valley adjacent to the park took about 40 minutes and we did not see a single living being the entire drive. There was a factory of some sort and even a small town we passed through, nothing was stirring. At the very end of the single road, we did unexpectedly run into something I had heard about but never knew where they were. The “Sailing Stones” are rocks that seem to float around on the sand as they heat and cool, leaving cryptic looking “drawings” behind. It was so unassuming and in the middle of nowhere we didn’t even know we were looking at them until we were nearly all the way past.

Once we got over the final pass and into the park, it was easy to understand how it got its name. It was only 89 degrees, but the air felt dead. The entrance was not staffed, and honestly the only place we saw anyone was at the Visitor Center. But the first attraction we stopped at was the Mesquite Flat Dunes. While it initially appears to be just another small set of sand dunes (though beautiful to look at), this was the first of at least two places’ parts of Star Wars: A New Hope was filmed. Here is the spot R2D2 decided to roll away from C3PO after arguing about the best way to go. There was no Krayt Dragon skeleton, just a couple Old Timers’ chatting outside an RV, drinking coffee. It would have been kind of neat to go on a hike out into the sand, but the last time I went out on a sand dune I regretted it.

Most of the park is at or below sea level. Combined with being in a valley, it adds up to oppressive daytime temperatures. It also makes for being very remote. There is one gas station inside the park, which I have read on more than one occasion is the most expensive one in the country. The day we drove past, it had a sign out front with a price of $6.29 per gallon. To say I was happy to have spent $4 a couple hours beforehand would be an understatement. But on to the main draw of Death Valley we went: Badwater Basin.


I can officially say I have now visited the lowest elevation on the surface of the United States, 282 feet below sea level. The salt on the ground is so thick and hard it feels like concrete. You can look out for miles and see nothing but more salt and sand. The sign stating the elevation is cool, but it doesn’t feel quite that impressive until you decide to turn back to your car and way up on the wall of the mountain road you drove in on is a small sign showing where sea level is. By this time, it was already sweltering, and we still had two more main sites to see.


Artist Pallet is one a one-way turnout loop off the main drive, very much worth the time. The draw is a small group of hills colored by volcanic deposits containing chlorite, iron, and others. The colors are a beautiful pastel and when we arrived the sun hadn’t quite gotten to it yet, so while it was warm it was very much worth getting out and hiking around. It was not strenuous, even with taking a little bit of a scramble off the trail to the top of a few hills.


The final stop for us was also the one I was looking the most forward to. It was also the only spot that felt even remotely crowded. Zabriskie Point is the spot I was hoping to get to before sunrise but failed. Even at midday and the sun beating down mercilessly on every person brave enough to get out of their car, I could barely contain my excitement. Yes, there is a half mile paved climb to get to it. Yes, it’s an incredible view. And YES, this is the spot Obi Wan Kenobi told Luke Skywalker, “You will never find a more wretched hive of scum and villainy. We must be cautious.”, as they were about to enter Mos Eisley. If you haven’t noticed yet I am a Star Wars fan, thankfully it’s not as nerdy as it was when I was a kid. This spot was much busier than any we had seen yet, it is very accessible by tour buses, RV’s and even though the walk up is steep, there are several places to stop and rest. If you are physically capable of getting there, please do. On a clear day, the Ranger’s say you can see Mt. Whitney from here. On our vacation, there was a distinct haze over everything but thankfully the Canadian Wildfires did not seem to be affecting us. So, we made the decision to take a circuitous route to our next destination that would take us past a closer view of Mt. Whitney and it’s friends.


Zabriskie Point, Leica M2
Driving through this part of California really makes you think about how much land here is just unusable for anything, and how truly wild it really is.
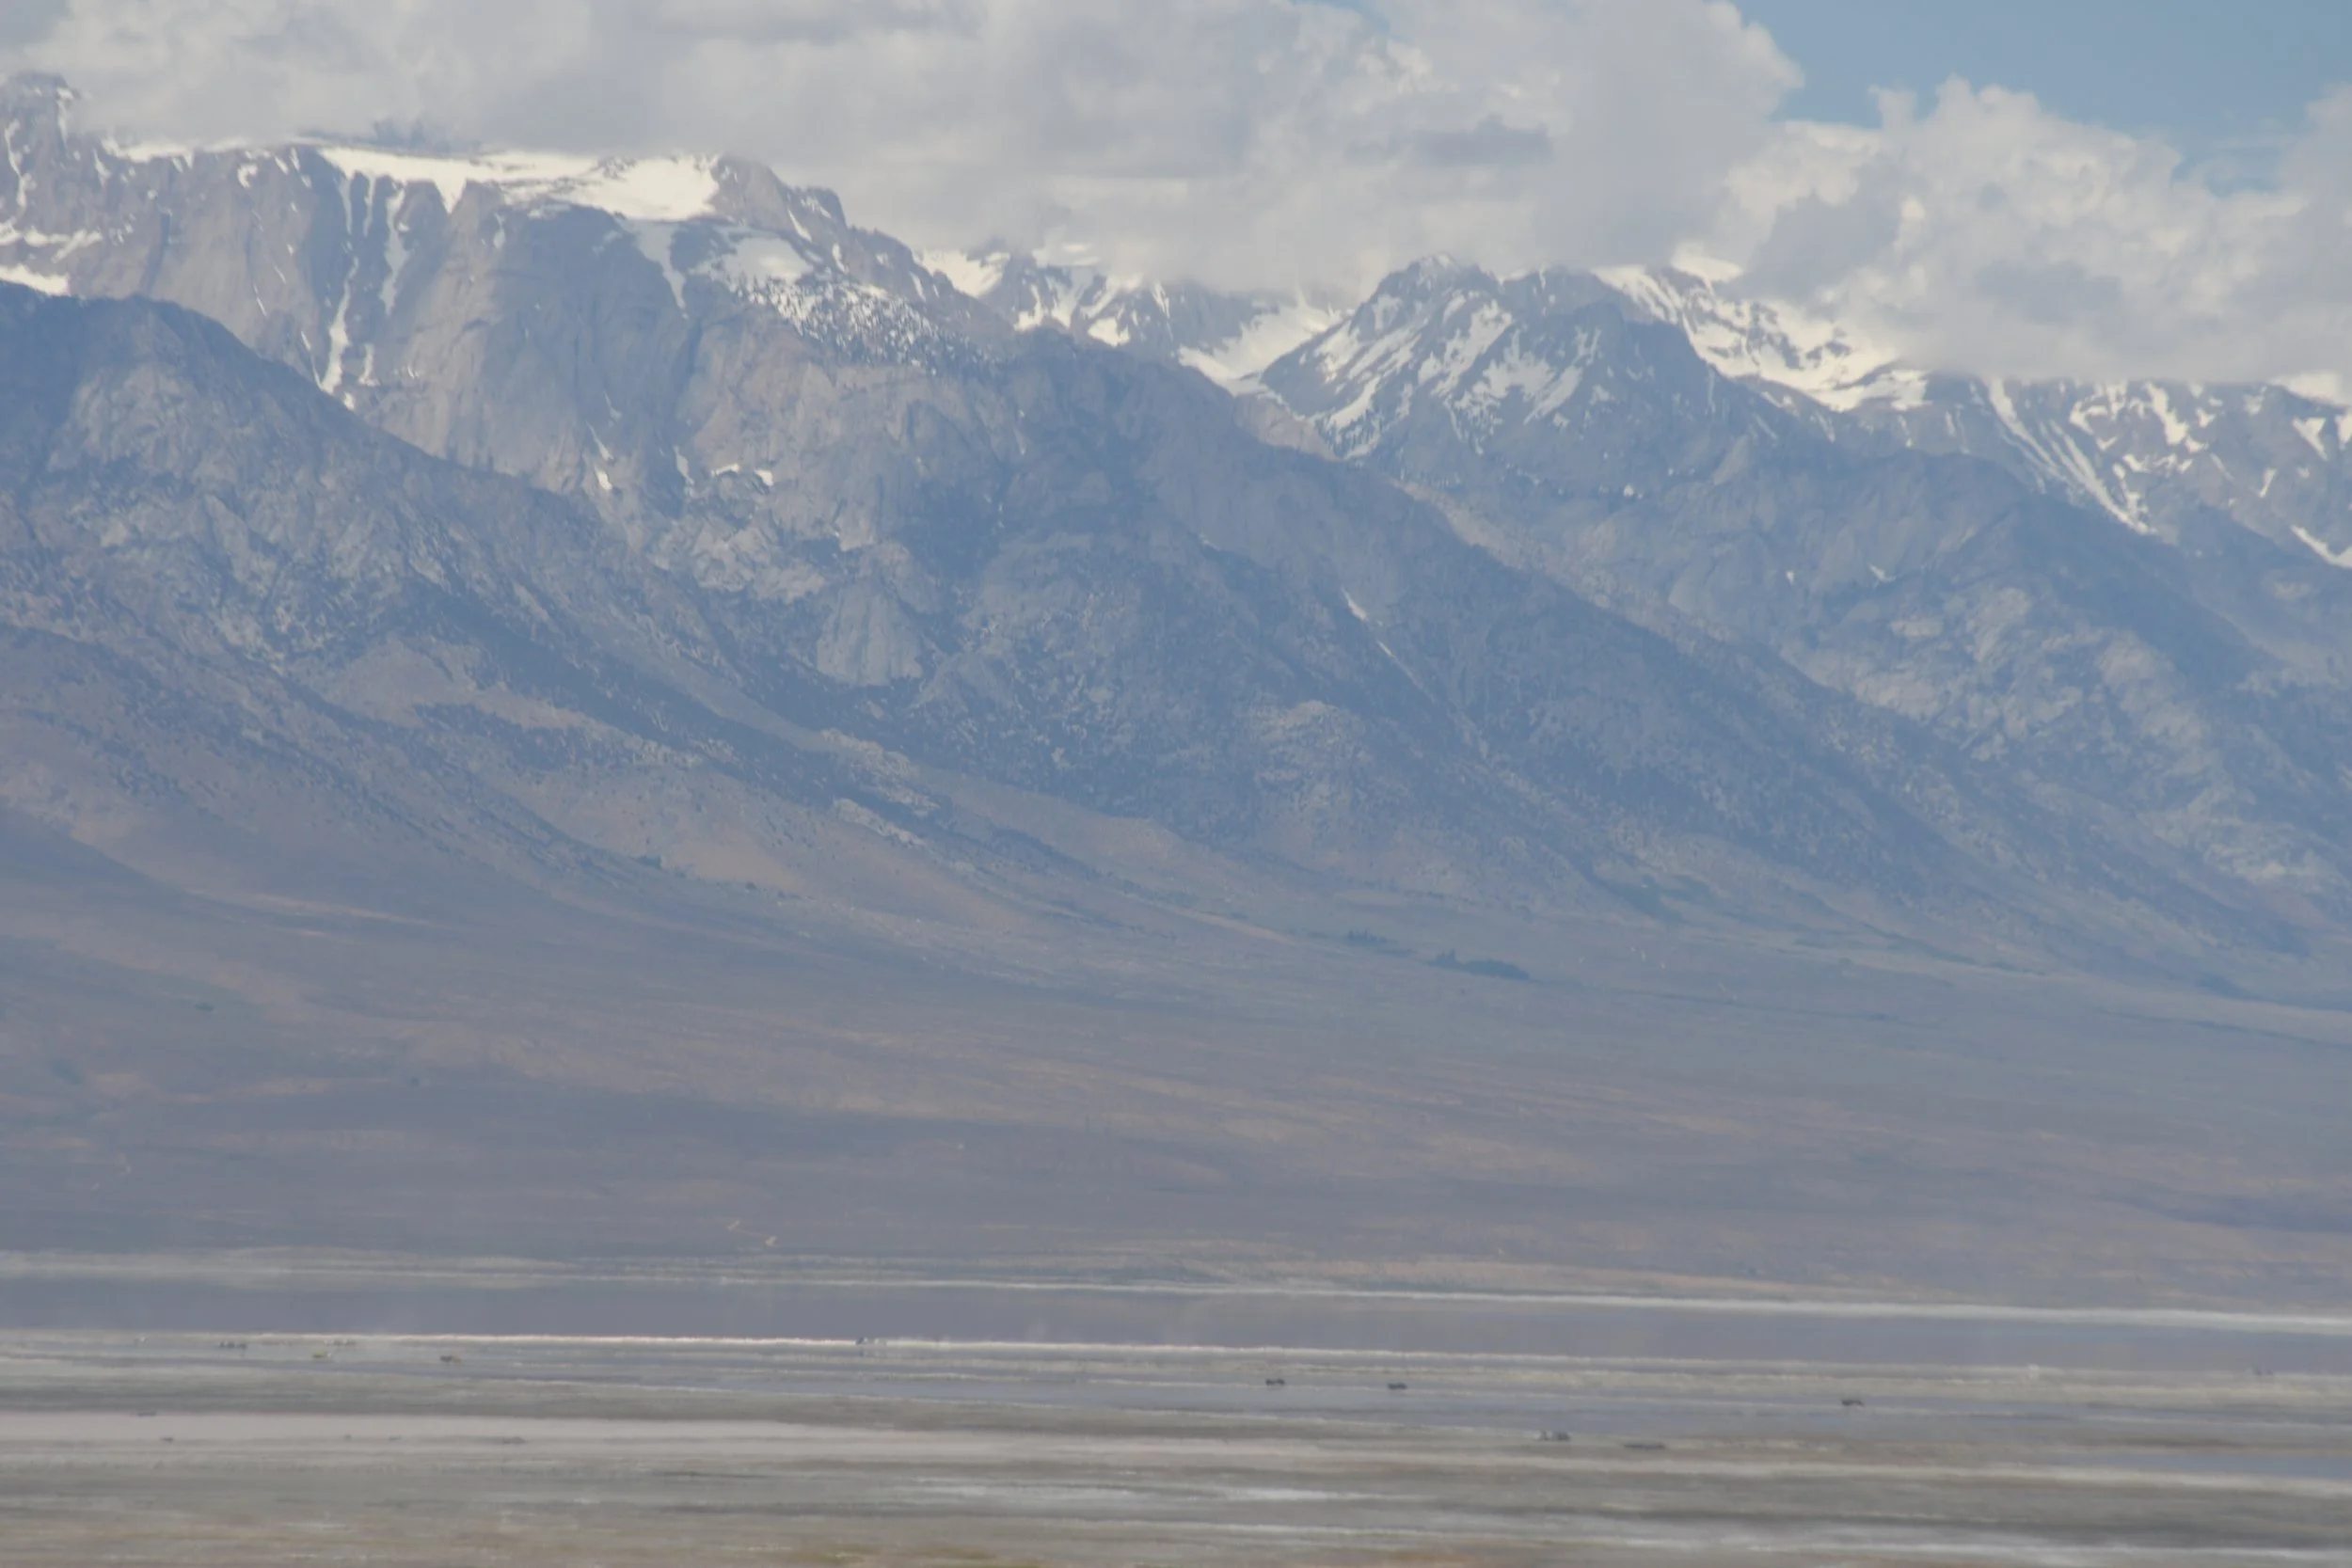
Mt Whitney, Nikon D500

Mt Whitney, Leica M2

Travel Blog 2023 #2: Joshua Tree
travel through Joshua tree national park and Coachella Valley
Road to Twentynine Palms
When I set out on vacation this year, I had intended on shooting everything solely on film, but at the last minute I decided to also pack a digital camera with my one lens that would cover any length I might need. Even though it’s an objectively “okayish” lens I figured I wouldn’t really need it since I was going to be taking amazing photos on film. I’m fortunate I did. Two of the first three rolls did not turn out. I don’t have any proof, but I am going to assume the high heat and moving between the outdoors and getting into an air-conditioned car caused it. The rest of my photos turned out for the trip, but these ones were lost to the 35mm altar of sacrifice. This post and photos will be fully digital, but I’ll be saving these for a future blog post about learning from my mistakes. Should be a good time to reflect on everything I’ve learned.

Joshua tree is an amazing place. I’ve wanted to visit for a while now, but it’s so far south in California and honestly there’s not much around to do outside the park, so I just wrote it off as a maybe someday if I’m driving within an hour of the entrance. Most people I’ve talked with only know Joshua Tree because of the U2 album with the same name. the cover of that album was shot at Zabriskie Point in Death Valley. The art director did scout several places in Joshua Tree and Twentynine Palms, but the focus ended up being the Joshua Tree itself, which is found abundantly throughout Southern California. It’s a super cool plant, but the highlights of the park have nothing to do with the plant itself for me.


As I mentioned, the main parts of the park are much smaller than other popular parks we’ve been too. I didn’t expect it to be the size of something like Yellowstone, but we were able to see most of the highlights by early afternoon. If you need to prioritize one hike for this park, the High View trail is amazing. It’s outside the park entrance, just past one of their campgrounds and it involves about a quarter mile of “off roading” that can still be managed by even a compact car. The trail itself is only about 1.3 meandering miles, taking you up to an overlook to see the desert valley and snow-covered peaks in the distance. We were warned to keep an eye out for rattlesnakes by the park employees, and fortunately we did not see any. Pro Tip: if you plan to make this trip, hike the trail counterclockwise. We did the loop, and the views are enough to keep you going. On the downslope, not so much. It’s still lovely but I don’t look around as much on the way down as I do on the way up.


The rest of the hikes and activities are either much shorter and easily accessed or much longer and we were not prepared to be on long hikes in the heat. The Keys Viewpoint was worth the trip itself. Getting out there from the main loop was a little over five miles drive, packed in on both sides by large Joshua Trees. But the overlook of the Coachella Valley was sublime. Even through the haze we could see for miles. The stark difference of being in Palm Springs, where civilization has been packed to beyond reasonable, and then standing above a valley with no sign of life for dozens of miles only a few hours away was very telling of the California experience.

Coachella Valley
When we made it back to the main trail, there was a pretty big change from the west side of the park. Where we had grown accustomed to seeing lots of plants and small wildlife, the further east we went it got more and more rocky. Most of the rest of the park was interesting rock formations: Oyster Bar looked like oysters coming out of the ground, Skull Rock looked like a human skull from a certain angle and Split Rock was as you might guess - a giant split rock.

Skull Rock

If we ever go back there are some longer hikes I would like to do, but would need to be in the cooler off-season. Geology Tour Road was closed for a wildfire while we were there, and it was newsworthy enough to make me want to go see what is down there. Overall, this was probably the best start to a National Parks trip we’ve had thus far. “Don’t Die today” signs are everywhere here and battling dehydration could be a problem if we spent too long in the park or attempted any of the longer hikes. I feel like we got our day’s worth of value. One note to keep in mind, there are two visitor centers, and both are outside the park in case you need to stop and get souvenirs or use a civilized rest room.

Joshua Tree North Visitor Center

Sunset over Death Valley
Travel Blog 2023 #1: West Coast National Parks
This year was our last big hurrah for National Parks West of the Mississippi. We’ve now hit most of the major parks, and it’s time to start looking East. The excitement of any trip starts with the tempering experience of a long drive. Going from Michigan to Southern California for us was going to be about 32 hours driving, and everyone handled it like a champ. We do not drive straight through like our parents did when we were kids. We like to take a few days and stop to see interesting things on the way. There wasn’t a lot to stop for to be honest, but all the signs for Uranus Fudge Factory in Missouri was a highlight. We didn’t stop, but they’ve definitely adopted to a Wall Drug billboard plan effectively.

For this trip I chose two cameras, a Nikon F2 and a Leica M2. Both were built in the 1960s and I did remember to test them ahead of time. There were plenty of times I had wished I brought a different camera for one reason or another, but the purpose of using just these was to force myself to be a little uncomfortable and not rely entirely on technology. These ones are just small, light, tight boxes and a lens. So far, I’ve gotten just a few rolls of film back and I hope the other ones I sent out are better. The Leica did not perform as well as I was expecting, but the Nikon worked perfectly. Fortunately, I did take my digital camera along and used it in times there were photos I wanted to guarantee a good copy of. In that case too, though, I only brought one small travel lens. Limiting myself on this trip has really made me realize how much I rely on a variety of equipment for different occasions. I don’t think I will be doing this intentionally in the future if I don’t absolutely need to.


The first two days of travel were not super interesting beyond the previously mentioned Fudge Factory signs. The first thing I saw and wanted to shoot was a makeshift military display with a very good condition tank. It made me nostalgic for the VFW near my childhood home with a full-size tank we could climb in. my parents weren’t a huge fan of me dropping into that tin can but occasionally they wouldn’t tell me no. We ended up making it to Tulsa, OK at the end of day one. Not a lot happening there, but I thought maybe we could stay in the same hotel Chandler Bing from FRIENDS stayed in. Guess what? It doesn’t exist.


Day two was slightly better as we were near Route 66 for most of it. If you ever consider traveling Route 66 for some of the cool stuff, make sure you research it beforehand. For the most part we just discovered stuff as we were zooming by on the expressway with no exit ramp anywhere within 20 miles. It felt very much like the scene in Cars when they explain what happened to Lightning McQueen and why nobody visits anymore. We did see the Cadillac Ranch at 70 MPH though, and I didn’t feel like we missed anything. There is a neat little abandoned town a couple miles west of that but overall, the Texas panhandle was just a pass through for us. Lots of dust devils and a few days after we passed through, they had a tornado that was on the news. Getting into Arizona and the Navajo Nation was a relief for the night. After the longest day of driving for the trip we made it to Flagstaff to a hotel we had stayed in before and it was a well needed rest.


Finally, day three started to be worth shooting film and taking time to enjoy what we were seeing. Beginning a day with a drive through the canyon on our way to Sedona was even more amazing than the first time we went through in 2020. It was also a little better because now I don’t mind driving slow when people are behind me, and they can just wait until I find the next turnout. It was also a Monday, and most stores were either closed or didn’t open for a while. It was a beautiful distraction for an hour.

We ended up taking a more scenic drive off the expressway near Phoenix and took Route 60 on the way to Joshua Tree. It was a very cool trip but there was such a drastic contrast between the abject poverty of one tiny town and then a few miles down the road a packed RV park full of hundred-thousand-dollar campers. The highlight of this stretch was easily the “SUNSET MOTEL” converted to a home. I was a little nervous as I had no idea if they were OK with me shooting it, but I took a chance and got a couple cool shots. If we ever end up in this area I would like to stop and take some time in several of the abandoned motels, restaurants and what I think was a general store. By the end of this day, we made it to Coachella, CA and I finally felt like vacation was started.
These first several days were defined for me by shots I wanted to take for myself but couldn’t reasonably stop to take. One in New Mexico I wanted bad enough I made a quick sketch of how I remembered it so if I ever take up painting someday, I can recreate it.
At the time of publishing this blog, I have been notified by the new photo lab I am using, thedarkroom.com, got my film and I really hope I have some usable images.